Matrix NymConnect Integration
Chat applications became an essential part of human communication. Matrix chat has end to end encryption on protocol level and Element app users can sort their communication into spaces and rooms. Now the Matrix communities can rely on network privacy as NymConnect supports Matrix chat protocol.
Currently there is no option in Matrix’s Element client to set a Socks5 proxy. In order to use Element via NymConnect users have to start it from the command-line. The setup is simple, for convenience a keyboard shortcut setting or terminal alias can be easily done.
Setup & Run
Make sure you have installed and started NymConnect on your desktop.
To then start Matrix’s Element client via a Socks5 proxy connected to NymConnect, open terminal and run:
Linux
element-desktop --proxy-server=socks5://127.0.0.1:1080
Mac
open -a Element --args --proxy-server=socks5://127.0.0.1:1080
Optimise setup with a keybinding / alias
Keybinding
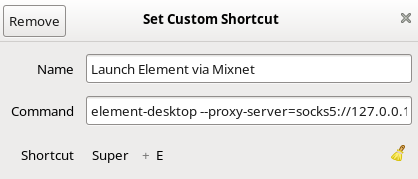
An eloquent solution to avoid entering a command every time is to setup your keybinding. Open your settings, navigate to Keyboard Shortcuts and choose to Set Custom Shortcut. Name and Shortcut fields are up to your preference, to the Command line add:
element-desktop --proxy-server=socks5://127.0.0.1:1080
Make sure your Shortcut isn’t already taken by something else in the menu.
An example can look like this.
Alternatively you can add a keybinding via the CLI, using whatever config files you edit for your given desktop environment / window manager.
Create an alias
If you prefer to simply shorten the length of the command (or all your keybindings are already taken) then you can simply create an alias for this long-winded command (this example aliases that command to the single word element, but you can replace it with whatever you like):
Linux
alias element="element-desktop --proxy-server=socks5://127.0.0.1:1080"
To make this alias persist, then add this to your .bashrc or .zshrc file (usually located in your $HOME directory) and source that file. This can be done by appending the alias command directly to the shell config file with one command.
For bash enter:
alias element="element-desktop --proxy-server=socks5://127.0.0.1:1080" >> ~/.bashrc
For zsh enter:
alias element="element-desktop --proxy-server=socks5://127.0.0.1:1080" >> ~/.zshrc
You can add the alias manually by opening your $HOME directory, enable hidden files (press ctrl + h) and open .bashrc or .zshrc file (based on your terminal setup) in a text editor, paste the string alias element="element-desktop --proxy-server=socks5://127.0.0.1:1080" to the the end, save and exit. Start a new terminal and run element.
Mac
alias element="open -a Element --args --proxy-server=socks5://127.0.0.1:1080"
To make this alias persist, then add this to your .zshrc (or .bashrc/.profile) file (usually located in your $HOME directory) and source that file. This can be done by appending the alias command directly to the shell config file with one command.
For zsh enter:
alias element="open -a Element --args --proxy-server=socks5://127.0.0.1:1080" >> ~/.zshrc
For .bashrc or .profile just change the end of the command.
You can add the alias manually by opening your $HOME directory, enable hidden files (in Finder press Shift + Command + .) and open .zshrc file (or .bashrc/.profile) in a text editor, paste the string alias element="open -a Element --args --proxy-server=socks5://127.0.0.1:1080" to the the end, save and exit. Start a new terminal and run element.
Now you can run Element through the Nym Mixnet with a single-word command.