Nym Node Configuration
Basic Changes
Nym Node can be configured directly by editing the config file (config.toml) located at ~/.nym/nym-nodes/<ID>/config/config.toml (by default ~/.nym/nym-nodes/default-nym-node/config/config.toml) or through commands on the binary.
Node Description
Operators can add a description themselves to share more information about their nym-node publicly.
To add or change nym-node description is done by editing description.toml file located in ~/.nym/nym-nodes/<NODE_ID>/data/description.toml. After saving, don’t forget to reload and restart your node service or simply restart your nym-node if you run it without a service (not recommended).
Query description
Nodes description can be queried from API endpoint /api/v1/description or via Swagger API UI page /api/v1/swagger/#/Node/description.
curl -X 'GET' \
  'http://<NODE_IP_ADDRESS>:8080/api/v1/description' \
  -H 'accept: application/json'

# or for https reversed proxy or WSS setup

curl -X 'GET' \
  'https://<HOSTNAME>/api/v1/description' \
  -H 'accept: application/json'
Commands & Examples
Disable sharing of system hardware info with the network:
./nym-node run --id <ID> --deny-init --mode entry-gateway -w --expose-system-hardware false --expose-system-info false
Note: --expose-system-info false supersedes --expose-system-hardware false. If both are present with conflicting values, the system hardware will not be shown.
VPS Setup and Automation
Replace
<NODE>variable with type of node you run, preferablynym-node(depreciatednym-mixnode,nym-gatewayornym-network-requester).
Automating your node with nohup, tmux and systemd
Although it’s not totally necessary, it’s useful to have the Mix Node automatically start at system boot time. We recommend to run your remote operation via tmux for easier management and a handy return to your previous session. For full automation, including a failed node auto-restart and ulimit setup, systemd is a good choice.
Do any of these steps and run your automated node before you start bonding process!
nohup
nohup is a command with which your terminal is told to ignore the HUP or ‘hangup’ signal. This will stop the node process ending if you kill your session.
nohup ./<NODE> run <OTHER_FLAGS> # use all the flags you use to run your node
tmux
One way is to use tmux shell on top of your current VPS terminal. Tmux is a terminal multiplexer, it allows you to create several terminal windows and panes from a single terminal. Processes started in tmux keep running after closing the terminal as long as the given tmux window was not terminated.
Use the following command to get tmux.
| Platform | Install Command |
|---|---|
| Arch Linux | pacman -S tmux |
| Debian or Ubuntu | apt install tmux |
| Fedora | dnf install tmux |
| RHEL or CentOS | yum install tmux |
| macOS (using Homebrew | brew install tmux |
| macOS (using MacPorts) | port install tmux |
| openSUSE | zypper install tmux |
In case it didn’t work for your distribution, see how to build tmux from version control.
Running tmux
Now you have installed tmux on your VPS, let’s run a Mix Node on tmux, which allows you to detach your terminal and let your <NODE> run on its own on the VPS.
- Pause your
<NODE> - Start tmux with the command
tmux
- The tmux terminal should open in the same working directory, just the layout changed into tmux default layout.
- Start the
<NODE>again with a command:
./<NODE> run <OTHER_FLAGS> # use all the flags you use to run your node
- Now, without closing the tmux window, you can close the whole terminal and the
<NODE>(and any other process running in tmux) will stay active. - Next time just start your teminal, ssh into the VPS and run the following command to attach back to your previous session:
tmux attach-session
- To see keybinding options of tmux press
ctrl+band after 1 second?
systemd
To automate with systemd use this init service file by saving it as /etc/systemd/system/nym-node.service and follow the next steps.
- Open the service file in a text editor
nano /etc/systemd/system/nym-node.service
- Paste this config file
[Unit]
Description=Nym Node
StartLimitInterval=350
StartLimitBurst=10

[Service]
User=<USER>
LimitNOFILE=65536
ExecStart=/home/<USER>/<PATH>/nym-node run # add all the flags you use to run your node
KillSignal=SIGINT
Restart=on-failure
RestartSec=30

[Install]
WantedBy=multi-user.target
Accepting T&Cs is done via a flag --accept-operator-terms-and-conditions added explicitly to nym-node run command every time. If you use systemd automation, add the flag to your service file’s ExecStart line.
- Save the file
Make sure your ExecStart <FULL_PATH> and run command are correct!
Example: If you have built nym in the $HOME directory on your server, your username is jetpanther, and node <ID> is puma, then the ExecStart line (command) in the script located in /etc/systemd/system/nym-mixnode.service for Nym Mixnode might look like this:
ExecStart=/home/jetpanther/nym/target/release/nym-node run --id puma.
Basically, you want the full /<PATH>/<TO>/nym-mixnode run --id <WHATEVER-YOUR-NODE-ID-IS>. If you are unsure about your /<PATH>/<TO>/<NODE>, then cd to your directory where you run your <NODE> from and run pwd command which returns the full path for you.
Following steps for Nym nodes running as systemd service
Once your init file is save follow these steps:
- Reload systemctl to pickup the new unit file
systemctl daemon-reload
- Enable the newly created service:
systemctl enable nym-node.service
- Start your
<NODE>as asystemdservice:
service nym-node start
This will cause your <NODE> to start at system boot time. If you restart your machine, your <NODE> will come back up automatically.
Useful systemd commands
- You can monitor system logs of your node by running:
journalctl -u nym-node -f
- Or check a status by running:
systemctl status <NODE>.service
# for example systemctl status nym-node.service
- You can also do
service <NODE> stoporservice <NODE> restart.
Note: if you make any changes to your systemd script after you’ve enabled it, you will need to run:
systemctl daemon-reload
This lets your operating system know it’s ok to reload the service configuration. Then restart your <NODE>.
Connectivity Test and Configuration
During our ongoing testing events Fast and Furious we found out, that after introducing IP Packet Router (IPR) and Nym exit policy on embedded Network Requester (NR) by default, only a fragment of Gateways routes correctly through IPv4 and IPv6. We built a useful monitor to check out your Gateway (nym-node --mode exit-gateway) at harbourmaster.nymtech.net.
IPv6 routing is not only a case for gateways. Imagine a rare occassion when you run a mixnode without IPv6 enabled and a client will sent IPv6 packets through the Mixnet through such route:
[client] -> [entry-gateway] -> [mixnode layer 1] -> [your mixnode] -> [IPv6 mixnode layer3] -> [exit-gateway]
In this (unusual) case your mixnode will not be able to route the packets. The node will drop the packets and its performance would go down. For that reason it’s beneficial to have IPv6 enabled when running a mixnode functionality.
Quick IPv6 Check
Make sure to keep your IPv4 address enabled while setting up IPv6, as the majority of routing goes through that one!
You can always check IPv6 address and connectivity by using some of these methods:
# locally listed IPv6 addresses
ip -6 addr

# globally reachable IPv6 addresses
ip -6 addr show scope global

# with DNS
dig -6 TXT +short o-o.myaddr.l.google.com @ns1.google.com
dig -t aaaa +short myip.opendns.com @resolver1.opendns.com

# https check
curl -6 https://ifconfig.co
curl -6 https://ipv6.icanhazip.com

# using telnet
telnet -6 ipv6.telnetmyip.com
IPv6 Configuration
While we’re working on Rust implementation to have these settings as a part of the binary build, we wrote a script to solve these connectivity requirements in the meantime we wrote a script network_tunnel_manager.sh to support the operators to configure their servers and address all the connectivity requirements.
Networking configuration across different ISPs and various operation systems does not have a generic solution. If the provided configuration setup doesn’t solve your problem check out IPv6 troubleshooting page. Be aware that you may have to do more research and customised adjustments.
Mode: exit-gateway
The nymtun0 interface is dynamically managed by the exit-gateway service. When the service is stopped, nymtun0 disappears, and when started, nymtun0 is recreated.
The script should be used in a context where nym-node --mode exit-gateway is running to fully utilise its capabilities, particularly for fetching IPv6 addresses or applying network rules that depend on the nymtun0 interface.
- Download
network_tunnel_manager.sh, make executable and run:
curl -o network_tunnel_manager.sh -L https://gist.githubusercontent.com/tommyv1987/ccf6ca00ffb3d7e13192edda61bb2a77/raw/9d785d6ee3aa2970553633eccbd89a827f49fab5/network_tunnel_manager.sh && chmod +x network_tunnel_manager.sh && ./network_tunnel_manager.sh
Here is a quick command explanation, for more details on the network_tunnel_manager.sh script, refer to the overview under the code block.
A summarized usage of network_tunnel_manager.sh
A summarized usage of network_tunnel_manager.sh
summary:
This is a comprehensive script for configuring network packet forwarding and iptables rules,
aimed at ensuring smooth operation of a tunnel interface.
It includes functionality for both setup and tear-down of nymtun network configurations,
alongside diagnostics for verifying system settings and network connectivity.

* fetch_ipv6_address_nym_tun - Fetches the IPv6 address assigned to the 'nymtun0'.
* fetch_and_display_ipv6 - Displays the IPv6 address on the default network device.
* apply_iptables_rules - Applies necessary IPv4 and IPv6 iptables rules.
* remove_iptables_rules - Removes applied IPv4 and IPv6 iptables rules.
* check_ipv6_ipv4_forwarding - Checks if IPv4 and IPv6 forwarding are enabled.
* check_nymtun_iptables - Check nymtun0 device
* perform_ipv4_ipv6_pings - Perform ipv4 and ipv6 pings to google
* check_ip6_ipv4_routing - Check ipv6 and ipv4 routing
* joke_through_the_mixnet - Run a joke through the mixnet via ipv4 and ipv6
- To run the script next time, just enter
./network_tunnel_manager <ARG>
-
Make sure your
nym-node --mode exit-gatewayservice is up running -
Check Nymtun IP tables:
sudo ./network_tunnel_manager.sh check_nymtun_iptables
Correct ./network_tunnel_manager.sh check_nymtun_iptables output:
Correct ./network_tunnel_manager.sh check_nymtun_iptables output:
iptables-persistent is already installed.
network Device: eth0
---------------------------------------

inspecting IPv4 firewall rules...
Chain FORWARD (policy DROP 0 packets, 0 bytes)
    0     0 ufw-reject-forward  all  --  *      *       0.0.0.0/0            0.0.0.0/0
    0     0 ACCEPT     all  --  nymtun0 eth0    0.0.0.0/0            0.0.0.0/0
    0     0 ACCEPT     all  --  eth0   nymtun0  0.0.0.0/0            0.0.0.0/0            state RELATED,ESTABLISHED
    0     0 ACCEPT     all  --  nymtun0 eth0    0.0.0.0/0            0.0.0.0/0
    0     0 ACCEPT     all  --  eth0   nymtun0  0.0.0.0/0            0.0.0.0/0            state RELATED,ESTABLISHED
    0     0 ACCEPT     all  --  nymtun0 eth0    0.0.0.0/0            0.0.0.0/0
    0     0 ACCEPT     all  --  eth0   nymtun0  0.0.0.0/0            0.0.0.0/0            state RELATED,ESTABLISHED
---------------------------------------

inspecting IPv6 firewall rules...
Chain FORWARD (policy DROP 0 packets, 0 bytes)
    0     0 ufw6-reject-forward  all      *      *       ::/0                 ::/0
    0     0 ACCEPT     all      eth0   nymtun0  ::/0                 ::/0                 state RELATED,ESTABLISHED
    0     0 ACCEPT     all      nymtun0 eth0    ::/0                 ::/0
    0     0 ACCEPT     all      eth0   nymtun0  ::/0                 ::/0                 state RELATED,ESTABLISHED
    0     0 ACCEPT     all      nymtun0 eth0    ::/0                 ::/0
    0     0 ACCEPT     all      eth0   nymtun0  ::/0                 ::/0                 state RELATED,ESTABLISHED
    0     0 ACCEPT     all      nymtun0 eth0    ::/0                 ::/0
operation check_nymtun_iptables completed successfully.
- If there’s no process running it wouldn’t return anything.
- In case you see
nymtun0but not active, this is probably because you are setting up a new (never bonded) node and not upgrading an exisitng one. In that case you need to bond your node now.
- Display IPv6:
sudo ./network_tunnel_manager.sh fetch_and_display_ipv6
- if you have a
global ipv6address this is good
Correct ./network_tunnel_manager.sh fetch_and_display_ipv6 output:
Correct ./network_tunnel_manager.sh fetch_and_display_ipv6 output:
iptables-persistent is already installed.
Using IPv6 address: 2001:db8:a160::1/112 #the address will be different for you
operation fetch_ipv6_address_nym_tun completed successfully.
- Apply the rules:
sudo ./network_tunnel_manager.sh apply_iptables_rules
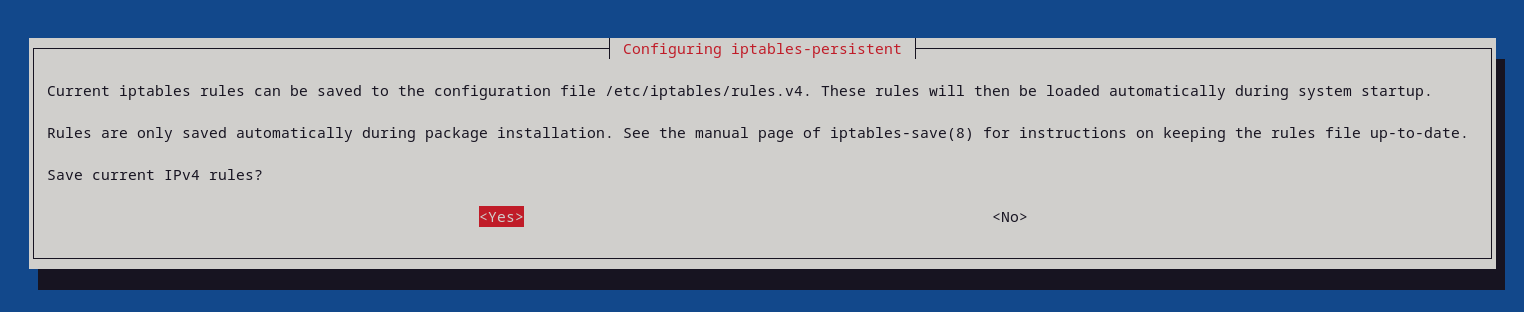
- The process may prompt you if you want to save current IPv4 and IPv6 rules, choose yes.
- check IPv6 again like in point 3
-
At this point your node needs to be bonded to the API for
nymtun0to interact with the network. After bonding please follow up with the remaining streps below to ensure that your Exit Gateway is routing properly. -
Check
nymtun0interface:
ip addr show nymtun0
Correct ip addr show nymtun0 output:
Correct ip addr show nymtun0 output:
# your addresses will be different
8: nymtun0: <POINTOPOINT,MULTICAST,NOARP,UP,LOWER_UP> mtu 1420 qdisc fq_codel state UNKNOWN group default qlen 500
    link/none
    inet 10.0.0.1/16 scope global nymtun0
       valid_lft forever preferred_lft forever
    inet6 2001:db8:a160::1/112 scope global
       valid_lft forever preferred_lft forever
    inet6 fe80::ad08:d167:5700:8c7c/64 scope link stable-privacy
       valid_lft forever preferred_lft forever`
- Validate your IPv6 and IPv4 networking by running a joke via Mixnet:
sudo ./network_tunnel_manager.sh joke_through_the_mixnet
Make sure that you get the validation of IPv4 and IPv6 connectivity. If there are still any problems, please refer to troubleshooting section.
Mode: mixnode
Most of the time the packets sent through the Mixnet are IPv4 based. The IPv6 packets are still pretty rare and therefore it’s not mandatory from operational point of view. If you preparing to run a nym-node with all modes enabled once this option is implemented, then the IPv6 setup on your VPS is required.
- Download
network_tunnel_manager.sh, make executable and run:
curl -o network_tunnel_manager.sh -L https://gist.githubusercontent.com/tommyv1987/ccf6ca00ffb3d7e13192edda61bb2a77/raw/9d785d6ee3aa2970553633eccbd89a827f49fab5/network_tunnel_manager.sh && chmod +x network_tunnel_manager.sh && ./network_tunnel_manager.sh
Here is a quick command explanation, for more details on the network_tunnel_manager.sh script, refer to the overview under the code block. Mind that for mixnode VPS setup we will use only a few of the commands.
A summarized usage of network_tunnel_manager.sh
A summarized usage of network_tunnel_manager.sh
summary:
This is a comprehensive script for configuring network packet forwarding and iptables rules,
aimed at ensuring smooth operation of a tunnel interface.
It includes functionality for both setup and tear-down of nymtun network configurations,
alongside diagnostics for verifying system settings and network connectivity.

* fetch_ipv6_address_nym_tun - Fetches the IPv6 address assigned to the 'nymtun0'.
* fetch_and_display_ipv6 - Displays the IPv6 address on the default network device.
* apply_iptables_rules - Applies necessary IPv4 and IPv6 iptables rules.
* remove_iptables_rules - Removes applied IPv4 and IPv6 iptables rules.
* check_ipv6_ipv4_forwarding - Checks if IPv4 and IPv6 forwarding are enabled.
* check_nymtun_iptables - Check nymtun0 device
* perform_ipv4_ipv6_pings - Perform ipv4 and ipv6 pings to google
* check_ip6_ipv4_routing - Check ipv6 and ipv4 routing
* joke_through_the_mixnet - Run a joke through the mixnet via ipv4 and ipv6
- To run the script next time, just enter
./network_tunnel_manager <ARG>
- Display IPv6:
sudo ./network_tunnel_manager.sh fetch_and_display_ipv6
- if you have a
global ipv6address this is good
Correct ./network_tunnel_manager.sh fetch_and_display_ipv6 output:
Correct ./network_tunnel_manager.sh fetch_and_display_ipv6 output:
iptables-persistent is already installed.
Using IPv6 address: 2001:db8:a160::1/112 #the address will be different for you
operation fetch_ipv6_address_nym_tun completed successfully.
- Apply the rules:
sudo ./network_tunnel_manager.sh apply_iptables_rules
- The process may prompt you if you want to save current IPv4 and IPv6 rules, choose yes.
- check IPv6 again like in point 2
- Check connectivity
telnet -6 ipv6.telnetmyip.com
Make sure that you get the validation of IPv4 and IPv6 connectivity. If there are still any problems, please refer to troubleshooting section.
Next Steps
There are a few more good suggestions for nym-node VPS configuration, especially to be considered for exit-gateway functionality, like Web Secure Socket or Reversed Proxy setup. Visit Proxy configuration page to see the guides.