Introduction

This is Nym’s technical documentation, containing information and setup guides about the various pieces of Nym software such as different mixnet infrastructure nodes, application clients, and existing applications like the desktop wallet and mixnet explorer.

If you are new to Nym and want to learn about the mixnet, how to integrate with the network, developer tutorials and quickstart guides, check out the Developer Portal.

If you are looking for information on grants and beta-release Nym apps, check out the Shipyard site.

Network Architecture:

Node setup and usage guides:

Client setup and usage guides:

SDK guides:

Last change: 2023-03-21, commit: c0ca04f

Network Overview

Nym is a privacy platform. It provides strong network-level privacy against sophisticated end-to-end attackers, and anonymous access control using blinded, re-randomizable, decentralized credentials. Our goal is to allow developers to build new applications, or upgrade existing apps, with privacy features unavailable in other systems.

The Nym platform knits together several privacy technologies, integrating them into a system of cooperating networked nodes.

At a high level, our technologies include:

  • a mixnet, which encrypts and mixes Sphinx packet traffic so that it cannot be determined who is communicating with whom. Our mixnet is based on a modified version of the Loopix design.
  • a privacy enhancing signature scheme called Coconut. Coconut allows a shift in thinking about resource access control, from an identity-based paradigm based on who you are to a privacy-preserving paradigm based on right to use.
  • Sphinx, a way of transmitting armoured, layer-encrypted information packets which are indistinguishable from each other at a binary level.
  • the Nyx blockchain, a general-purpose CosmWasm-enabled smart contract platform, and the home of the smart contracts which keep track of the mixnet.

The most important thing to note is that these technologies ensure privacy at two different levels of the stack: network data transmission, and transactions.

Here’s an overview diagram of the different types of nodes making up the network:

Nym Platform

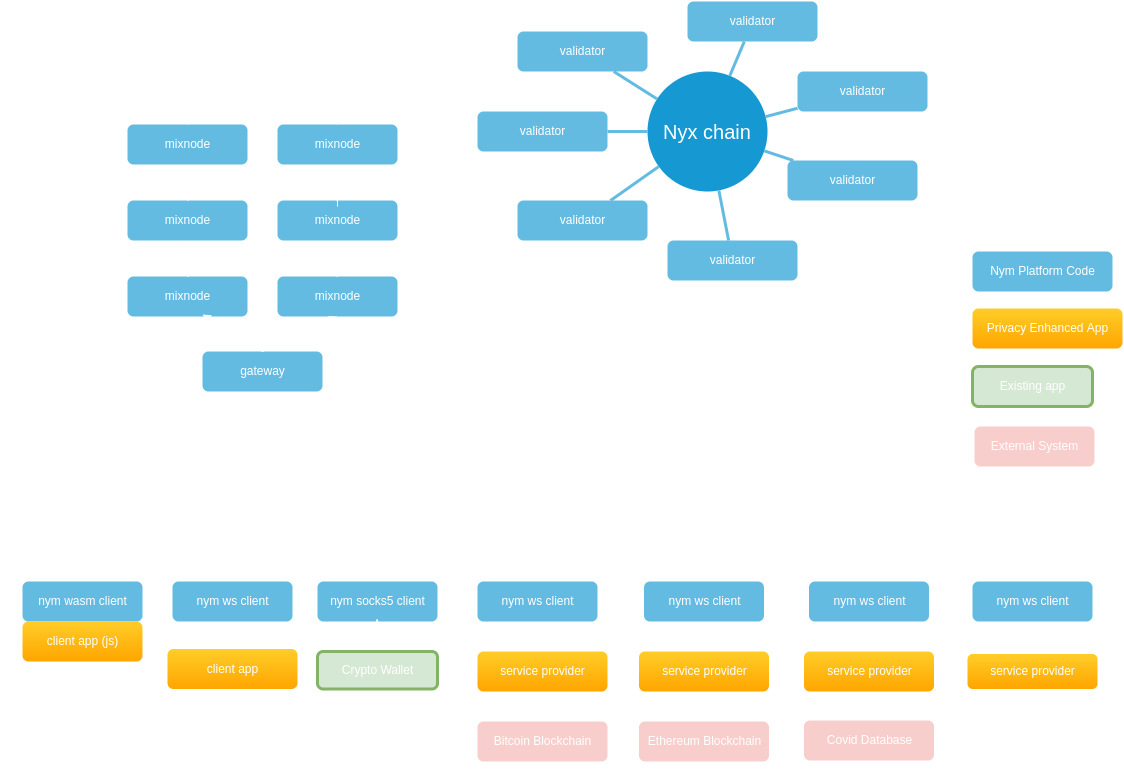
Developers can think of the network as being comprised of infrastructure nodes and clients for interacting with this infrastructure via Privacy-enhanced applications (PEApps).

Mixnet Infrastructure

The mixnet - the different pieces of software that your traffic will pass through when using an privacy-enhanced app (PEApp) - is made up of several different types of nodes:

  • Mix Nodes provide network security for network content and metadata, making it impossible to see who is communicating with who, by performing packet-mixing on traffic travelling through the network.

  • Gateways act as message storage for clients which may go offline and come back online again, and defend against denial of service attacks. The default gateway implementation included in the Nym platform code holds packets for later retrieval. For many applications (such as simple chat), this is usable out of the box, as it provides a place that potentially offline clients can retrieve packets from. The access token allows clients to pull messages from the gateway node.

  • Services are applications that communicate with nym clients, listening and sending traffic to the mixnet. This is an umbrella term for a variety of different pieces of code, such as the network requester binary.

  • Nyx Blockchain Validators secure the network with proof-of-stake Sybil defenses, determine which nodes are included within the network, and work together to create Coconut threshold credentials which provide anonymous access to data and resources. They also produce blocks and secure the Nyx Blockchain. Initially, this chain was used only to house the CosmWasm smart contracts keeping track of Nym’s network topology, token vesting contracts, and the NYM token itself. In recent months, we’ve decided to expand the role of Nyx and instead expand its role by making it an open smart contract platform for anyone to upload CosmWasm smart contracts to. Validators also provide privacy-enhanced credentials based on the testimony of a set of decentralized, blockchain-based issuing authorities. Nym validators use the Coconut signature scheme to issue credentials. This allows privacy apps to generate anonymous resource claims through decentralised authorities, then use them with Service Providers.

Privacy-enhanced applications (PEApps)

PEApps use a Nym client to connect to the network in order to get the available Network Topology for traffic routing, and send/receive packets to other users and services. Clients, in order to send traffic through the mixnet, connect to gateways. Since applications may go online and offline, a client’s gateway provides a sort of mailbox where apps can receive their messages.

Nym clients connect to gateways. Messages are automatically piped to connected clients and deleted from the gateway’s disk storage. If a client is offline when a message arrives, it will be stored for later retrieval. When the client connects, all messages will be delivered, and deleted from the gateway’s disk.

When it starts up, a client registers itself with a gateway, and the gateway returns an access token. The access token plus the gateway’s IP can then be used as a form of addressing for delivering packets.

There are two basic kinds of privacy enhanced applications:

  • Client apps running on mobile or desktop devices. These will typically expose a user interface (UI) to a human user. These might be existing apps such as crypto wallets that communicate with Nym via our SOCKS5 proxy, or entirely new apps.
  • Service Providers, which will usually run on a server, and take actions on behalf of users without knowing who they are.

Service Providers (SPs) may interact with external systems on behalf of a user. For example, an SP might submit a Bitcoin, Ethereum or Cosmos transaction, proxy a network request, talk to a chat server, or provide anonymous access to a medical system such as a privacy-friendly coronavirus tracker.

There is also a special category of Service Provider, namely SPs that do not visibly interact with any external systems. You might think of these as crypto-utopiapps: they’re doing something, but it’s not possible from outside to say with any certainty what their function is, or who is interacting with them.

All apps talk with gateways using Sphinx packets and a small set of simple control messages. These messages are sent to gateways over websockets. Each app client has a long-lived relationship with its gateway; Nym defines messages for clients registering and authenticating with gateways, as well as sending encrypted Sphinx packets.

Last change: 2023-03-21, commit: c0ca04f

Mixnet Traffic Flow

Technical Motivations

When you send data across the internet, it can be recorded by a wide range of observers: your ISP, internet infrastructure providers, large tech companies, and governments.

Even if the content of a network request is encrypted, observers can still see that data was transmitted, its size, frequency of transmission, and gather metadata from unencrypted parts of the data (such as IP routing information). Adversaries may then combine all the leaked information to probabilistically de-anonymize users.

The Nym mixnet provides very strong security guarantees against this sort of surveillance. It packetizes and mixes together IP traffic from many users inside the mixnet.

If you’re into comparisons, the Nym mixnet is conceptually similar to other systems such as Tor, but provides improved protections against end-to-end timing attacks which can de-anonymize users. When Tor was first fielded, in 2002, those kinds of attacks were regarded as science fiction. But the future is now here.

Mixnet Traffic Flow

The Nym mixnet re-orders encrypted, indistinguishable Sphinx packets as they travel through the gateways and mix nodes.

Traffic to send through the mixnet is broken up into uniformly-sized packets, encrypted in the Sphinx packet format according to the route the packet will take, and sent through the mixnet to be mixed among other real traffic and fake - but identical - ‘dummy traffic’.

At each ‘hop’ (i.e. as a packet is forwarded from one node in the sequence to another) a layer of decryption is removed from the Sphinx packet, revealing the address of the next hop, and another Sphinx packet. The packet is then held by the node for a variable amount of time, before being forwarded on to the next node in the route.

Traffic always travels through the nodes of the mixnet like such:

                                                                               
       +----------+              +----------+             +----------+                 
       | Mix Node |<-----------> | Mix Node |<----------->| Mix Node |                 
       | Layer 1  |              | Layer 2  |             | Layer 3  |                 
       +----------+              +----------+             +----------+                 
            ^                                                   ^                      
            |                                                   |                      
            |                                                   |                      
            v                                                   v                      
    +--------------+                                   +-----------------+        
    | Your gateway |                                   | Service gateway |        
    +--------------+                                   +-----------------+        
            ^                                                    ^                     
            |                                                    |                     
            |                                                    |                     
            v                                                    v                     
  +-------------------+                                +-------------------+           
  | +---------------+ |                                | +---------------+ |           
  | |  Nym client   | |                                | |  Nym Client   | |           
  | +---------------+ |                                | +---------------+ |           
  |         ^         |                                |         ^         |           
  |         |         |                                |         |         |           
  |         |         |                                |         |         |           
  |         v         |                                |         v         |           
  | +---------------+ |                                | +---------------+ |           
  | | Your app code | |                                | | Service Code  | |           
  | +---------------+ |                                | +---------------+ |           
  +-------------------+                                +-------------------+           
   Your Local Machine**                               Service Provider Machine**        


** note that depending on the technical setup, the Nym client running on these machines may
be either a seperate process or embedded in the same process as the app code via one of our SDKs. 

From your Nym client, your encrypted traffic is sent to:

  • the gateway your client has registered with,
  • a mix node on layer 1 of the Mixnet,
  • a mix node on layer 2 of the Mixnet,
  • a mix node on layer 3 of the Mixnet,
  • the recipient’s gateway, which forwards it finally to…
  • the recipient’s Nym client, which communicates with an application.

If the recipient’s Nym client is offline at the time then the packets will be held by the Gateway their Nym client has registered with until they come online.

Whatever is on the ‘other side’ of the mixnet from your client, all traffic will travel this way through the mixnet. If you are sending traffic to a service external to Nym (such as a chat application’s servers) then your traffic will be sent from the recieving Nym client to an application that will proxy it ‘out’ of the mixnet to these servers, shielding your metadata from them. P2P (peer-to-peer) applications, unlike the majority of apps, might want to keep all of their traffic entirely ‘within’ the mixnet, as they don’t have to necessarily make outbound network requests to application servers. They would simply have their local application code communicate with their Nym clients, and not forward traffic anywhere ‘outside’ of the mixnet.

Acks & Package Retransmission

Whenever a hop is completed, the recieving node will send back an acknowledgement (‘ack’) so that the sending node knows that the packet was recieved. If it does not recieve an ack after sending, it will resend the packet, as it assumes that the packet was dropped for some reason. This is done under the hood by the binaries themselves, and is never something that developers and node operators have to worry about dealing with themselves.

Packet retransmission means that if a client sends 100 packets to a gateway, but only receives an acknowledgement (‘ack’) for 95 of them, it will resend those 5 packets to the gateway again, to make sure that all packets are received. All nodes in the mixnet support packet retransmission.

                                                                                                               
  +-------------------+                  +-------------------+                                                
  | +---------------+ |                  |                   | Packet lost in transmission - no ack recieved! 
  | |  Nym client   | |                  |                   |-----------------?                              
  | +-------^-------+ |Send 100 packets  |                   |                                                     
  |         |         |----------------->|   Gateway your    |  Resend packet    +------------------+     etc...  
  |         |         |                  |   client is       |------------------>|                  |------------------> 
  |         |         |                  |   connected to    |                   | Mix node layer 1 |          
  |         v         | Send 100 acks    |                   |<------------------|                  |         
  | +---------------+ |<-----------------|                   |   Send ack        +------------------+        
  | | Your app code | |                  |                   |                                              
  | +---------------+ |                  |                   |                                             
  +-------------------+                  +-------------------+                                            
   Your Local Machine                                                                                    

Private Replies using SURBs

SURBs (‘Single Use Reply Blocks’) allow apps to reply to other apps anonymously.

It will often be the case that a client app wants to interact with a service of some kind, or a P2P application on someone else’s machine. It sort of defeats the purpose of the whole system if your client app needs to reveal its own gateway public key and client public key in order to get a response from the service/app.

Luckily, SURBs allow for anonymous replies. A SURB is a layer encrypted set of Sphinx headers detailing a reply path ending in the original app’s address. SURBs are encrypted by the client, so the recieving service/app can attach its response and send back the resulting Sphinx packet, but it never has sight of who it is replying to.

MultiSURBs were implemented in v1.1.4. Clients, when sending a message to another client, attach a bundle of SURBs which can be used by the receiver to construct large anonymous replies, such as files. If a reply is too large still (i.e. it would use more SURBs than sent with the original message), the receiver will use a SURB to ask the sender for more SURBs.

What this means in practice is that files can now be sent via anonymous replies!

Last change: 2023-03-21, commit: c0ca04f

Pre-built Binaries

The Github releases page has pre-built binaries which should work on Ubuntu 20.04 and other Debian-based systems, but at this stage cannot be guaranteed to work everywhere.

If the pre-built binaries don’t work or are unavailable for your system, you will need to build the platform yourself.

Last change: 2023-03-21, commit: c0ca04f

Building from Source

Nym runs on Mac OS X, Linux, and Windows. All nodes except the Desktop Wallet and NymConnect on Windows should be considered experimental - it works fine if you’re an app developer but isn’t recommended for running nodes.

Building Nym

Nym has two main codebases:

This page details how to build the main Nym platform code. If you want to build and run a validator, go here instead.

Prerequisites

  • (Debian/Ubuntu) pkg-config, build-essential, libssl-dev, curl, jq, git
sudo apt update
sudo apt install pkg-config build-essential libssl-dev curl jq git
  • (Arch/Manjaro) base-devel
pacman -S base-devel
  • (Mac OS X) pkg-config , brew, openss1, protobuf, curl, git

curl - required for transferring data over various protocols. It’s used for downloading files or send requests to a server.

openssl - used for encryption, decryption, and secure communication over the internet.

protobuf - for serialising and deserialising structured data in a fast and efficient way.

Running the following the script installs Homebrew and the above dependencies:

/bin/bash -c "$(curl -fsSL https://raw.githubusercontent.com/Homebrew/install/HEAD/install.sh)"
  • Rust & cargo >= 1.66

We recommend using the Rust shell script installer. Installing cargo from your package manager (e.g. apt) is not recommended as the packaged versions are usually too old.

If you really don’t want to use the shell script installer, the Rust installation docs contain instructions for many platforms.

Download and build Nym binaries

The following commands will compile binaries into the nym/target/release directory:

rustup update
git clone https://github.com/nymtech/nym.git
cd nym

git reset --hard # in case you made any changes on your branch
git pull # in case you've checked it out before

git checkout release/v1.1.12 # checkout to the latest release branch: `develop` will most likely be incompatible with deployed public networks

cargo build --release # build your binaries with **mainnet** configuration
NETWORK=sandbox cargo build --release # build your binaries with **sandbox** configuration

Quite a bit of stuff gets built. The key working parts are:

The repository also contains Typescript applications which aren’t built in this process. These can be built by following the instructions on their respective docs pages.

You cannot build from GitHub’s .zip or .tar.gz archive files on the releases page - the Nym build scripts automatically include the current git commit hash in the built binary during compilation, so the build will fail if you use the archive code (which isn’t a Git repository). Check the code out from github using git clone instead.

You cannot build from GitHub’s .zip or .tar.gz archive files on the releases page - the Nym build scripts automatically include the current git commit hash in the built binary during compilation, so the build will fail if you use the archive code (which isn’t a Git repository). Check the code out from github using git clone instead.

Last change: 2023-03-21, commit: c0ca04f

Binary Initialisation and Configuration

All Nym binaries must first be initialised with init before being run.

The init command is usually where you pass flags specifying configuration arguments such as the gateway you wish to communicate with, the ports you wish your binary to listen on, etc.

The init command will also create the necessary keypairs and configuration files at ~/.nym/<BINARY_TYPE>/<BINARY_ID>/ if these files do not already exist. It will not overwrite existing keypairs if they are present.

You can reconfigure your binaries at any time by editing the config file located at ~/.nym/<BINARY_TYPE>/<BINARY_ID>/config/config.toml and restarting the binary process.

Once you have run init, you can start your binary with the run command, usually only accompanied by the id of the binary that you specified.

This id is never transmitted over the network, and is used to select which local config and key files to use for startup.

Last change: 2023-03-21, commit: c0ca04f

Version Compatibility Table

There are numerous components to Nym which are released independently of one another aside from when breaking changes occur in the core platform code - mix nodes, gateways, network requesters, and clients.

Whilst in general it recommended to be running the most recent version of any software, if you cannot do that for whatever reason this table will tell you which versions of different components are mutually compatible with which platform code releases.

Core PlatformSDKWalletNymConnectNetwork ExplorerMixnet contractVesting contract
1.1.1 - 1.1.12*1.1.4 - 1.1.71.1.0 - 1.1.121.1.1 - 1.1.121.1.0 - 1.1.21.1.0 - 1.1.31.1.0 - 1.1.3
1.1.0 - 1.1.11.1.41.1.01.1.0 - 1.1.11.1.01.1.01.1.0
1.1.0x1.1.01.1.01.1.01.1.01.1.0

* the nym-mixnode binary is currently one point ahead of the main platform release version

There are seperate changelogs for NymConnect and the Desktop Wallet. The changelog referenced below is for the core platform code.

Platform release changelog
1.1.11 (CHANGELOG)
1.1.10 (CHANGELOG)
1.1.9 (CHANGELOG)
1.1.8 (CHANGELOG)
1.1.7 (CHANGELOG)
1.1.6 (CHANGELOG)
1.1.5 (CHANGELOG)
1.1.4 (CHANGELOG)
1.1.3 (CHANGELOG)
1.1.2 (CHANGELOG)
1.1.1 (CHANGELOG)
1.1.0 (CHANGELOG)
1.0.2 (CHANGELOG)
1.0.1 (CHANGELOG)
1.0.0 (CHANGELOG)
Last change: 2023-03-21, commit: c0ca04f

Node Setup Guides

This section contains setup guides for the following node types:

Last change: 2023-03-21, commit: c0ca04f

Mix Nodes

The Nym mix node binary was built in the building nym section. If you haven’t yet built Nym and want to run the code, go there first.

Info

The nym-mixnode binary is currently one point version ahead of the rest of the platform binaries due to a patch applied between releases:

  • platform binaries version: v1.1.12
  • mix node binary version: v1.1.13

Preliminary steps

There are a couple of steps that need completing before starting to set up your mix node:

  • preparing your wallet
  • requisitioning a VPS (Virtual Private Server)

Wallet preparation

Mainnet

Before you initialise and run your mixnode, head to our website and download the Nym wallet for your operating system. If pre-compiled binaries for your operating system aren’t availiable, you can build the wallet yourself with instructions here.

If you don’t already have one, please create a Nym address using the wallet, and fund it with tokens. The minimum amount required to bond a mixnode is 100 NYM, but make sure you have a bit more to account for gas costs.

NYM is currently present on several exchanges. Head to our telegram channels to find out where to get NYM tokens.

Remember that you can only use Cosmos NYM tokens to bond your mixnode. You cannot use ERC20 representations of NYM to run a node.

Sandbox testnet

Make sure to download a wallet and create an account as outlined above. Then head to our token faucet and get some tokens to use to bond it.

VPS Hardware Specs

You will need to rent a VPS to run your mix node on. One key reason for this is that your node must be able to send TCP data using both IPv4 and IPv6 (as other nodes you talk to may use either protocol).

For the moment, we haven’t put a great amount of effort into optimizing concurrency to increase throughput, so don’t bother provisioning a beastly server with multiple cores. This will change when we get a chance to start doing performance optimizations in a more serious way. Sphinx packet decryption is CPU-bound, so once we optimise, more fast cores will be better.

For now, see the below rough specs:

  • Processors: 2 cores are fine. Get the fastest CPUs you can afford.
  • RAM: Memory requirements are very low - typically a mix node may use only a few hundred MB of RAM.
  • Disks: The mixnodes require no disk space beyond a few bytes for the configuration files.

Mix node setup

Now that you have built the codebase, set up your wallet, and have a VPS with the nym-mixnode binary, you can set up your mix node with the instructions below.

Viewing command help

You can check that your binaries are properly compiled with:

./nym-mixnode --help

Which should return a list of all avaliable commands.

Console output

  _ __  _   _ _ __ ___
 | '_ \| | | | '_ \ _ \
 | | | | |_| | | | | | |
 |_| |_|\__, |_| |_| |_|
        |___/

         (mixnode - version v1.1.13)


nym-mixnode v1.1.13
Nymtech
Implementation of a Loopix-based Mixnode

USAGE:
    nym-mixnode [OPTIONS] <SUBCOMMAND>

OPTIONS:
        --config-env-file <CONFIG_ENV_FILE>
            Path pointing to an env file that configures the mixnode

    -h, --help
            Print help information

    -V, --version
            Print version information

SUBCOMMANDS:
    completions          Generate shell completions
    describe             Describe your mixnode and tell people why they should delegate state to you
    generate-fig-spec    Generate Fig specification
    help                 Print this message or the help of the given subcommand(s)
    init                 Initialise the mixnode
    node-details         Show details of this mixnode
    run                  Starts the mixnode
    sign                 Sign text to prove ownership of this mixnode
    upgrade              Try to upgrade the mixnode

    nym-mixnode v1.1.13
    Nymtech

You can also check the various arguments required for individual commands with:

./nym-mixnode <command> --help

Initialising your mix node

To check available configuration options for initializing your node use:

./nym-mixnode init --help

Console output

  _ __  _   _ _ __ ___
 | '_ \| | | | '_ \ _ \
 | | | | |_| | | | | | |
 |_| |_|\__, |_| |_| |_|
        |___/

         (mixnode - version v1.1.13)


nym-mixnode-init
Initialise the mixnode

USAGE:
    nym-mixnode init [OPTIONS] --id <ID> --host <HOST> --wallet-address <WALLET_ADDRESS>

OPTIONS:
        --announce-host <ANNOUNCE_HOST>
            The custom host that will be reported to the directory server

    -h, --help
            Print help information

        --host <HOST>
            The host on which the mixnode will be running

        --http-api-port <HTTP_API_PORT>
            The port on which the mixnode will be listening for http requests

        --id <ID>
            Id of the mixnode we want to create config for

        --mix-port <MIX_PORT>
            The port on which the mixnode will be listening for mix packets

        --validators <VALIDATORS>
            Comma separated list of rest endpoints of the validators

        --verloc-port <VERLOC_PORT>
            The port on which the mixnode will be listening for verloc packets

        --wallet-address <WALLET_ADDRESS>
            The wallet address you will use to bond this mixnode, e.g.
            nymt1z9egw0knv47nmur0p8vk4rcx59h9gg4zuxrrr9

Initalise your mixnode with the following command, replacing the value of --id with the moniker you wish to give your mixnode, and the --wallet-address with the Nym address you created earlier. Your --host must be publicly routable on the internet in order to mix packets, and can be either an Ipv4 or IPv6 address. The $(curl ifconfig.me) command returns your IP automatically using an external service. If you enter your IP address manually, enter it without any port information.

./nym-mixnode init --id winston-smithnode --host $(curl ifconfig.me) --wallet-address <wallet-address>

The init command will refuse to destroy existing mix node keys.

During the init process you will have the option to change the http_api, verloc and mixnode ports from their default settings. If you wish to change these in the future you can edit their values in the config.toml file created by the initialization process, which is located at ~/.nym/mixnodes/<your-id>/.

Bonding your mix node

Caution

From v1.1.3, if you unbond your mixnode that means you are leaving the mixnet and you will lose all your delegations (permanently). You can join again with the same identity key, however, you will start with no delegations.

You can bond your mix node via the Desktop wallet.

Open your wallet, and head to the Bond page, then select the node type and input your node details.

Bond via the CLI (power users)

If you want to bond your mix node via the CLI, then check out the Nym CLI tool.

Running your mix node

Now you’ve bonded your mix node, run it with:

./nym-mixnode run --id winston-smithnode

Console output


Starting mixnode winston-smithnode...

To bond your mixnode you will need to install the Nym wallet, go to https://nymtech.net/get-involved and select the Download button.
Select the correct version and install it to your machine. You will need to provide the following:

Identity Key: GWrymUuLaxVHSs8iE7YW48MB81npnKjrVuJzJsGkeji6
Sphinx Key: FU89ULkS4YYDXcm5jShhJvoit7H4jG4EXHxRKbS9cXSJ
Owner Signature: Kd5StZtg5PsjLtWRJ5eQejuLHz3JUNzZrk6Jd4WVS5u9Q5bFt6DvuVzN7NbiX9WMZYpsYMJoegH3Bz94o6gsY6b
Host: 62.240.134.46 (bind address: 62.240.134.46)
Version: v1.1.13
Mix Port: 1789, Verloc port: 1790, Http Port: 8000

You are bonding to wallet address: n1x42mm3gsdg808qu2n3ah4l4r9y7vfdvwkw8az6


2022-04-27T16:08:01.159Z INFO  nym_mixnode::node > Starting nym mixnode
2022-04-27T16:08:01.490Z INFO  nym_mixnode::node > Starting node stats controller...
2022-04-27T16:08:01.490Z INFO  nym_mixnode::node > Starting packet delay-forwarder...
2022-04-27T16:08:01.490Z INFO  nym_mixnode::node > Starting socket listener...
2022-04-27T16:08:01.490Z INFO  nym_mixnode::node::listener > Running mix listener on "62.240.134.46:1789"
2022-04-27T16:08:01.490Z INFO  nym_mixnode::node           > Starting the round-trip-time measurer...

If everything worked, you’ll see your node running on the either the Sandbox testnet network explorer or the mainnet network explorer, depending on which network you’re running.

Note that your node’s public identity key is displayed during startup, you can use it to identify your node in the list.

Keep reading to find out more about configuration options or troubleshooting if you’re having issues. There are also some tips for running on AWS and other cloud providers, some of which require minor additional setup.

Also have a look at the saved configuration files in $HOME/.nym/mixnodes/ to see more configuration options.

Describe your mix node (optional)

In order to easily identify your node via human-readable information later on in the development of the testnet when delegated staking is implemented, you can describe your mixnode with the following command:

./nym-mixnode describe --id winston-smithnode

Console output

name: winston-smithnode
description: nym-mixnode hosted on Linode VPS in <location> with the following specs: <specs>.
link, e.g. https://mixnode.yourdomain.com: mixnode.mydomain.net
location, e.g. City: London, Country: UK: <your_location>

This information will be shown in the mixnode's page in the Network Explorer, and help people make delegated staking decisions.

Remember to restart your mix node process in order for the new description to be propogated

Upgrading your mix node

Upgrading your node is a two-step process:

Step 1: upgrading your binary

Follow these steps to upgrade your mix node binary and update its config file:

  • pause your mix node process
  • replace the existing binary with the newest binary (which you can either compile yourself or grab from our releases page)
  • re-run init with the same values as you used initially. This will just update the config file, it will not overwrite existing keys.
  • restart your mix node process with the new binary.

Do not use the upgrade command: there is a known error with the command that will be fixed in a subsequent release.

Step 2: updating your node information in the smart contract

Follow these steps to update the information about your mix node which is publically avaliable from the Nym API and information displayed on the mixnet explorer.

You can either do this graphically via the Desktop Wallet, or the CLI.

Updating node information via the Desktop Wallet

  • Navigate to the Bonding page and click the Node Settings link in the top right corner: Bonding page

  • Update the fields in the Node Settings page and click Submit changes to the blockchain. Node Settings Page

Updating node information via the CLI

You can use either the nyxd binary or the Nym-CLI tool to update your node information from the command line. With Nym-CLI, this command looks like this:

./nym-cli -c <config_file_with_mnemonic>  mixnet operators mixnode settings update-config --version <new_version>

You can read more about the Nym CLI tool here.

Displaying mix node information

You can always check the details of your mix node with the node-details command:

./nym-mixnode node-details --id winston-smithnode

Console output


Identity Key: GWrymUuLaxVHSs8iE7YW48MB81npnKjrVuJzJsGkeji6
Sphinx Key: FU89ULkS4YYDXcm5jShhJvoit7H4jG4EXHxRKbS9cXSJ
Owner Signature: Kd5StZtg5PsjLtWRJ5eQejuLHz3JUNzZrk6Jd4WVS5u9Q5bFt6DvuVzN7NbiX9WMZYpsYMJoegH3Bz94o6gsY6b
Host: 62.240.134.46 (bind address: 62.240.134.46)
Version: v1.1.13
Mix Port: 1789, Verloc port: 1790, Http Port: 8000

You are bonding to wallet address: n1x42mm3gsdg808qu2n3ah4l4r9y7vfdvwkw8az6

VPS Setup and Automation

Configure your firewall

The following commands will allow you to set up a firewall using ufw.

# check if you have ufw installed
ufw version
# if it is not installed, install with
sudo apt install ufw -y
# enable ufw
sudo ufw enable
# check the status of the firewall
sudo ufw status

Finally open your mix node’s p2p port, as well as ports for ssh, http, and https connections, and ports 8000 and 1790 for verloc and measurement pings:

sudo ufw allow 1789,1790,8000,22,80,443/tcp
# check the status of the firewall
sudo ufw status

For more information about your mix node’s port configuration, check the mix node port reference table below.

Automating your mix node with systemd

It’s useful to have the mix node automatically start at system boot time. Here’s a systemd service file to do that:

[Unit]
Description=Nym Mixnode (v1.1.13)
StartLimitInterval=350
StartLimitBurst=10

[Service]
User=nym
LimitNOFILE=65536
ExecStart=/home/nym/nym-mixnode run --id mix0100
KillSignal=SIGINT
Restart=on-failure
RestartSec=30

[Install]
WantedBy=multi-user.target

Put the above file onto your system at /etc/systemd/system/nym-mixnode.service.

Change the path in ExecStart to point at your mix node binary (nym-mixnode), and the User so it is the user you are running as.

If you have built nym on your server, and your username is jetpanther, then the start command might look like this:

ExecStart=/home/jetpanther/nym/target/release/nym-mixnode run --id your-id. Basically, you want the full /path/to/nym-mixnode run --id whatever-your-node-id-is

Then run:

systemctl enable nym-mixnode.service

Start your node:

service nym-mixnode start

This will cause your node to start at system boot time. If you restart your machine, the node will come back up automatically.

You can also do service nym-mixnode stop or service nym-mixnode restart.

Note: if you make any changes to your systemd script after you’ve enabled it, you will need to run:

systemctl daemon-reload

This lets your operating system know it’s ok to reload the service configuration.

Setting the ulimit

Linux machines limit how many open files a user is allowed to have. This is called a ulimit.

ulimit is 1024 by default on most systems. It needs to be set higher, because mix nodes make and receive a lot of connections to other nodes.

If you see errors such as:

Failed to accept incoming connection - Os { code: 24, kind: Other, message: "Too many open files" }

This means that the operating system is preventing network connections from being made.

Set the ulimit via systemd service file

Query the ulimit of your mix node with:

grep -i "open files" /proc/$(ps -A -o pid,cmd|grep nym-mixnode | grep -v grep |head -n 1 | awk '{print $1}')/limits

You’ll get back the hard and soft limits, which looks something like this:

Max open files            65536                65536                files

If your output is the same as above, your node will not encounter any ulimit related issues.

However if either value is 1024, you must raise the limit via the systemd service file. Add the line:

LimitNOFILE=65536

Reload the daemon:

systemctl daemon-reload

or execute this as root for system-wide setting of ulimit:

echo "DefaultLimitNOFILE=65535" >> /etc/systemd/system.conf

Reboot your machine and restart your node. When it comes back, use cat /proc/$(pidof nym-mixnode)/limits | grep "Max open files" to make sure the limit has changed to 65535.

Set the ulimit on non-systemd based distributions

Edit etc/security/conf and add the following lines:

# Example hard limit for max opened files
username        hard nofile 4096
# Example soft limit for max opened files
username        soft nofile 4096

Then reboot your server and restart your mixnode.

Node Families

Node family involves setting up a group of mix nodes that work together to provide greater privacy and security for network communications. This is achieved by having the nodes in the family share information and routes, creating a decentralized network that makes it difficult for third parties to monitor or track communication traffic.

Create a Node Family

To create a Node family, you will need to install and configure multiple mix nodes, and then use the CLI to link them together into a family. Once your Node family is up and running, you can use it to route your network traffic through a series of nodes, obscuring the original source and destination of the communication.

You can use either nym-cli which can be downloaded from the release page or compiling nyxd.

/path/to/the/release and run the following on the family head to obtain the signature for the member:

./nym-mixnode sign --id winston-smithnode --text <text>

Console output


      _ __  _   _ _ __ ___
     | '_ \| | | | '_ \ _ \
     | | | | |_| | | | | | |
     |_| |_|\__, |_| |_| |_|
            |___/

             (nym-mixnode - version v1.1.13)

Signing the text "APxUbCmGp4K9qDzvwVADJFNu8S3JV1AJBw7q6bS5KN9E" using your mixnode's Ed25519 identity key...
The base58-encoded signature on 'APxUbCmGp4K9qDzvwVADJFNu8S3JV1AJBw7q6bS5KN9E' is: 2ZuCFYU91pvEcgAj6EzU33oozazvsRAoxP7NQHFM6Xy6AkJrzgCZdnsnZYAmxFtqe8Su17KXwpTHQtkVmAnAiV4H

Using nym-cli:

--mnemonic is the mnemonic of the member wanting to be the head of family.

/nym-cli cosmwasm execute <wallet-address> '{"create_family": {"signature": "<base58-encoded-signature>","family_head": "<text>","owner_signature":"<node owner signature>","label": "<node label>"}}' --mnemonic <mnemonic from node to be the head>

Using nyxd:

--from is mnemonic of the member wanting to join the family.

./nyxd tx wasm execute ${MIXNET-CONTRACT} '{"join_family": {"signature": "<base58-encoded-signature>","family_head": "<text>"}}' --node ${VALIDATOR-ENDPOINT} --from mix1 --chain-id nyx --gas-prices 0.025unym --gas auto --gas-adjustment 1.3 -y -b block

To get the node owner signature, use:

./nym-mixnode node-details --id <id>

Joining a Node Family

/path/to/the/release and run the following on the family head to obtain the signature for the member:

./nym-mixnode sign --id mixnode --text <text>

Console output


 | '_ \| | | | '_ \ _ \
 | | | | |_| | | | | | |
 |_| |_|\__, |_| |_| |_|
        |___/

         (nym-mixnode - version v1.1.13)

Signing the text “4yRfauFzZnejJhG2FACTVQ7UnYEcFUYw3HzXrmuwLMaR” using your mixnode’s Ed25519 identity key… The base58-encoded signature on ‘4yRfauFzZnejJhG2FACTVQ7UnYEcFUYw3HzXrmuwLMaR’ is: 4By7EQEMM8BAt6ptxJyeGqpoxHWxeRUhyJ4wMr2x3mXSQD9nvttkvd7tgP1uKu2ktJjB2bLzD1oaZ33d2Wv5eYWp

Using nym-cli:

./nym-cli cosmwasm execute <wallet-address> '{"join_family": {"signature": "<base58-encoded-signature>","family_head": "<text>","owner_signautre": "<owner signature from node to join>", "label":"<node to join label>"}}'  --mnemonic <mnemonic-from-node-to-join>

Using nyxd:

./nyxd tx wasm execute ${MIXNET-CONTRACT} '{"join_family": {"signature": "<base58-encoded-signature>","family_head": "<text>"}}' --node ${VALIDATOR-ENDPOINT} --from mix1 --chain-id nyx --gas-prices 0.025unym --gas auto --gas-adjustment 1.3 -y -b block

To get the node owner signature, use:

./nym-mixnode node-details --id <id>

Leaving a family

If wanting to leave, run the same initial command as above, followed by:

Using nym-cli:

./nym-cli cosmwasm execute n17srjznxl9dvzdkpwpw24gg668wc73val88a6m5ajg6ankwvz9wtst0cznr '{"leave_family": {"signature": "<base58-encoded-signature>","family_head": "<text>","owner_signautre": "<owner signature from node to leave>"}}'  --mnemonic <mnemonic-from-node-to leave>

Using nyxd:

./nyxd tx wasm execute ${MIXNET-CONTRACT} '{"join_family": {"signature": "<base58-encoded-signature>","family_head": "<text>"}}' --node ${VALIDATOR-ENDPOINT} --from mix1 --chain-id nyx --gas-prices 0.025unym --gas auto --gas-adjustment 1.3 -y -b block

Checking that your node is mixing correctly

Network explorers

Once you’ve started your mix node and it connects to the validator, your node will automatically show up in the ‘Mix nodes’ section of either the Nym Network Explorers:

Enter your identity key to find your node. There are numerous statistics about your node on that page that are useful for checking your uptime history, packets mixed, and any delegations your node may have.

There are also 2 community explorers which have been created by Nodes Guru:

For more details see Troubleshooting FAQ

Virtual IPs and hosting via Google & AWS

On some services (AWS, Google, etc), the machine’s available bind address is not the same as the public IP address. In this case, bind --host to the local machine address returned by ifconfig, but also specify --announce-host with the public IP. Please make sure that you pass the correct, routable --announce-host.

For example, on a Google machine, you may see the following output from the ifconfig command:

ens4: flags=4163<UP,BROADCAST,RUNNING,MULTICAST>  mtu 1460
        inet 10.126.5.7  netmask 255.255.255.255  broadcast 0.0.0.0
        ...

The ens4 interface has the IP 10.126.5.7. But this isn’t the public IP of the machine, it’s the IP of the machine on Google’s internal network. Google uses virtual routing, so the public IP of this machine is something else, maybe 36.68.243.18.

nym-mixnode init --host 10.126.5.7, initalises the mix node, but no packets will be routed because 10.126.5.7 is not on the public internet.

Trying nym-mixnode init --host 36.68.243.18, you’ll get back a startup error saying AddrNotAvailable. This is because the mix node doesn’t know how to bind to a host that’s not in the output of ifconfig.

The right thing to do in this situation is nym-mixnode init --host 10.126.5.7 --announce-host 36.68.243.18.

This will bind the mix node to the available host 10.126.5.7, but announce the mix node’s public IP to the directory server as 36.68.243.18. It’s up to you as a node operator to ensure that your public and private IPs match up properly.

Metrics / API endpoints

The mix node binary exposes several API endpoints that can be pinged in order to gather information about the node, and the Nym API (previously ‘Validator API’) exposes numerous mix node related endpoints which provide network-wide information about mix nodes, the network topology (the list of avaliable mix nodes for packet routing), and information regarding uptime monitoring and rewarding history.

Mix node API endpoints

Since the mix node binary exposes several API endpoints itself, you can ping these easily via curl:

EndpointDescriptionCommand
/descriptionReturns the description of the node set with the describe commandcurl <NODE_IP_ADDRESS>:8000/description
/hardwareReturns the hardware information of the nodecurl <NODE_IP_ADDRESS>:8000/hardware
/verlocReturns the verloc information of the node, updated every 12 hourscurl <NODE_IP_ADDRESS>:8000/verloc

The code for exposed API endpoints can be found here.

You can get more detailed info by appending ?debug to the URL, like so: curl http://<NODE_IP_ADDRESS>:8000/stats?debug

Numerous endpoints are documented on the Nym API (previously ‘Validator API’)’s Swagger Documentation. There you can also try out various requests from your broswer, and download the response from the API. Swagger will also show you what commands it is running, so that you can run these from an app or from your CLI if you prefer.

Mix node Reward Estimation API endpoint

The Reward Estimation API endpoint allows mix node operators to estimate the rewards they could earn for running a Nym mixnode with a specific mix_id.

The {mix_id} can be found in the “Mix ID” column of the Network Explorer.

The endpoint is a particularly common for mix node operators as it can provide an estimate of potential earnings based on factors such as the amount of traffic routed through the mixnode, the quality of the mix node’s performance, and the overall demand for mix nodes in the network. This information can be useful for mix node operators in deciding whether or not to run a mix node and in optimizing its operations for maximum profitability.

Using this API endpoint returns information about the Reward Estimation:

/status/mixnode/{mix_id}/reward-estimation

Query Response:

    "estimation": {
        "total_node_reward": "942035.916721770541325331",
        "operator": "161666.263307386408152071",
        "delegates": "780369.65341438413317326",
        "operating_cost": "54444.444444444444444443"
    },

The unit of value is measured in uNYM.

  • estimated_total_node_reward - An estimate of the total amount of rewards that a particular mix node can expect to receive during the current epoch. This value is calculated by the Nym Validator based on a number of factors, including the current state of the network, the number of mix nodes currently active in the network, and the amount of network traffic being processed by the mix node.

  • estimated_operator_reward - An estimate of the amount of rewards that a particular mix node operator can expect to receive. This value is calculated by the Nym Validator based on a number of factors, including the amount of traffic being processed by the mix node, the quality of service provided by the mix node, and the operator’s stake in the network.

  • estimated_delegators_reward - An estimate of the amount of rewards that mix node delegators can expect to receive individually. This value is calculated by the Nym Validator based on a number of factors, including the amount of traffic being processed by the mix node, the quality of service provided by the mix node, and the delegator’s stake in the network.

  • estimated_node_profit - An estimate of the profit that a particular mix node operator can expect to earn. This value is calculated by subtracting the mix node operator’s operating_costs from their estimated_operator_reward for the current epoch.

  • estimated_operator_cost - An estimate of the total cost that a particular mix node operator can expect to incur for their participation. This value is calculated by the Nym Validator based on a number of factors, including the cost of running a mix node, such as server hosting fees, and other expenses associated with operating the mix node.

Ports

All mix node-specific port configuration can be found in $HOME/.nym/mixnodes/<your-id>/config/config.toml. If you do edit any port configs, remember to restart your mix node.

Mix node port reference

Default portUse
1789Listen for mixnet traffic
1790Listen for VerLoc traffic
8000Metrics http API endpoint
Last change: 2023-03-21, commit: c0ca04f

Gateways

The Nym gateway was built in the building nym section. If you haven’t yet built Nym and want to run the code, go there first.

Preliminary steps

There are a couple of steps that need completing before starting to set up your gateway:

  • preparing your wallet
  • requisitioning a VPS (Virtual Private Server)

Wallet preparation

Mainnet

Before you initialise and run your gateway, head to our website and download the Nym wallet for your operating system. If pre-compiled binaries for your operating system aren’t availiable, you can build the wallet yourself with instructions here.

If you don’t already have one, please create a Nym address using the wallet, and fund it with tokens. The minimum amount required to bond a gateway is 100 NYM, but make sure you have a bit more to account for gas costs.

NYM is currently present on several exchanges. Head to our telegram or Discord channels to find out where to get NYM tokens.

Remember that you can only use native Cosmos NYM tokens to bond your gateway. You cannot use ERC20 representations of NYM to run a node.

Sandbox testnet

Make sure to download a wallet and create an account as outlined above. Then head to our token faucet and get some tokens to use to bond it.

VPS Hardware Specs

You will need to rent a VPS to run your mix node on. One key reason for this is that your node must be able to send TCP data using both IPv4 and IPv6 (as other nodes you talk to may use either protocol.

We currently have these rough specs for VPS hardware:

  • Processors: 2 cores are fine. Get the fastest CPUs you can afford.
  • RAM: Memory requirements depend on the amount of users your Gateway will be serving at any one time. If you’re just going to be using it yourself, then minimal RAM is fine. If you’re running your Gateway as part of a Service Grant, get something with at least 4GB RAM.
  • Disks: much like the amount of RAM your Gateway could use, the amount of disk space required will vary with the amount of users your Gateway is serving. If you’re running your Gateway as part of a Service Grant, get something with at least 40GB storage.

Gateway setup

Now that you have built the codebase, set up your wallet, and have a VPS with the nym-gateway binary, you can set up your gateway with the instructions below.

Viewing command help

You can check that your binaries are properly compiled with:

./nym-gateway --help

Console output

  _ __  _   _ _ __ ___
 | '_ \| | | | '_ \ _ \
 | | | | |_| | | | | | |
 |_| |_|\__, |_| |_| |_|
        |___/

         (gateway - version v1.1.12)

    
nym-gateway v1.1.12
Nymtech
Implementation of the Nym Mixnet Gateway

USAGE:
    nym-gateway [OPTIONS] <SUBCOMMAND>

OPTIONS:
        --config-env-file <CONFIG_ENV_FILE>
            Path pointing to an env file that configures the gateway

    -h, --help
            Print help information

    -V, --version
            Print version information

SUBCOMMANDS:
    completions          Generate shell completions
    generate-fig-spec    Generate Fig specification
    help                 Print this message or the help of the given subcommand(s)
    init                 Initialise the gateway
    node-details         Show details of this gateway
    run                  Starts the gateway
    sign                 Sign text to prove ownership of this mixnode
    upgrade              Try to upgrade the gateway
    

You can also check the various arguments required for individual commands with:

./nym-gateway <command> --help

Initialising your gateway (standard mode)

Caution

If you are following these instructions to set up a gateway as part of a Service Grant, ignore these instructions and jump to the step below

To check available configuration options use:

 ./nym-gateway init --help

Console output


  _ __  _   _ _ __ ___
 | '_ \| | | | '_ \ _ \
 | | | | |_| | | | | | |
 |_| |_|\__, |_| |_| |_|
        |___/

         (gateway - version v1.1.12)

    
nym-gateway-init 
Initialise the gateway

USAGE:
    nym-gateway init [OPTIONS] --id <ID> --host <HOST> --wallet-address <WALLET_ADDRESS>

OPTIONS:
        --announce-host <ANNOUNCE_HOST>
            The host that will be reported to the directory server

        --clients-port <CLIENTS_PORT>
            The port on which the gateway will be listening for clients gateway-requests

        --datastore <DATASTORE>
            Path to sqlite database containing all gateway persistent data

        --enabled-statistics <ENABLED_STATISTICS>
            Enable/disable gateway anonymized statistics that get sent to a statistics aggregator server

    -h, --help
            Print help information

        --host <HOST>
            The custom host on which the gateway will be running for receiving sphinx packets

        --id <ID>
            Id of the gateway we want to create config for

        --mix-port <MIX_PORT>
            The port on which the gateway will be listening for sphinx packets

        --mnemonic <MNEMONIC>
            Cosmos wallet mnemonic needed for double spending protection

        --statistics-service-url <STATISTICS_SERVICE_URL>
            URL where a statistics aggregator is running. The default value is a Nym aggregator server

        --validator-apis <VALIDATOR_APIS>
            Comma separated list of endpoints of the validators APIs

        --validators <VALIDATORS>
            Comma separated list of endpoints of the validator

        --wallet-address <WALLET_ADDRESS>
            The wallet address you will use to bond this gateway, e.g.
            nymt1z9egw0knv47nmur0p8vk4rcx59h9gg4zuxrrr9

The following command returns a gateway on your current IP with the id of supergateway:

./nym-gateway init --id supergateway --host $(curl ifconfig.me) --wallet-address <WALLET_ADDRESS> --enabled-statistics true

The $(curl ifconfig.me) command above returns your IP automatically using an external service. Alternatively, you can enter your IP manually wish. If you do this, remember to enter your IP without any port information.

Initialising your gateway (stats mode)

The following command returns a gateway on your current IP with the id of supergateway with statistics enabled:

./nym-gateway init --id supergateway --host $(curl ifconfig.me) --wallet-address <WALLET_ADDRESS> --mnemonic <MNEMONIC> --enabled-statistics true

The $(curl ifconfig.me) command above returns your IP automatically using an external service. Alternatively, you can enter your IP manually wish. If you do this, remember to enter your IP without any port information.

Bonding your gateway

You can bond your gateway via the Desktop wallet.

Open your wallet, and head to the Bond page, then select the node type and input your node details.

Via the CLI (power users)

If you want to bond your Gateway via the CLI, then check out the Nym CLI tool.

Running your gateway (standard mode)

Caution

If you are following these instructions to set up a gateway as part of a Service Grant, ignore these instructions and jump to the step below

The run command starts the gateway:

./nym-gateway run --id supergateway

Console output

Starting gateway supergateway...

To bond your gateway you will need to install the Nym wallet, go to https://nymtech.net/get-involved and select the Download button.
Select the correct version and install it to your machine. You will need to provide the following: 

Identity Key: 6jWSJZsQ888jwzi1CBfkHefiDdUEjgwfeMfJU4RNhDuk
Sphinx Key: HbqYJwjmtzDi4WzGp7ehj8Ns394sRvJnxtanX28upon
Owner Signature: wRKxr1CnoyBB9AYPSaXgE4dCP757ffMz5gkja8EKaYR82a63FK9HYV3HXZnLcSaNXkzN3CJnxG2FREv1ZE9xwvx
Host: 62.240.134.46 (bind address: 62.240.134.46)
Version: 1.1.
Mix Port: 1789, Clients port: 9000
Data store is at: "/home/mx/.nym/gateways/supergateway/data/db.sqlite"
2022-04-27T16:04:33.831Z INFO  nym_gateway::node > Starting nym gateway!
2022-04-27T16:04:34.268Z INFO  nym_gateway::node > Starting mix packet forwarder...
2022-04-27T16:04:34.269Z INFO  nym_gateway::node > Starting mix socket listener...
2022-04-27T16:04:34.269Z INFO  nym_gateway::node::mixnet_handling::receiver::listener > Running mix listener on "62.240.134.46:1789"
2022-04-27T16:04:34.269Z INFO  nym_gateway::node              
> Starting client [web]socket listener...
2022-04-27T16:04:34.269Z INFO  nym_gateway::node                                      > Finished nym gateway startup procedure - it should now be able to receive mix and client traffic!

Running your gateway (stats mode)

./nym-gateway run --id supergateway --enabled-statistics true

The --enabled-statistics flag starts the gateway in a mode which reports very minimal usage statistics - the amount of bytes sent to a service, and the number of requests - to a service we run, as part of the Nym Connect Beta testing.

Use the following command to ping our stats service to see what it has recorded (remember to change the 'until' date):

curl -d '{"since":"2022-07-26T12:46:00.000000+00:00", "until":"2022-07-26T12:57:00.000000+00:00"}' -H "Content-Type: application/json" -X POST https://mainnet-stats.nymte.ch:8090/v1/all-statistics

Console output

      [
        {
            "Service":{
              "requested_service":"chat-0.core.keybaseapi.com:443",
              "request_processed_bytes":294,
              "response_processed_bytes":0,
              "interval_seconds":60,
              "timestamp":"2022-07-26 12:55:44.459257091"
            }
        },
        {
            "Service":{
              "requested_service":"chat-0.core.keybaseapi.com:443",
              "request_processed_bytes":890,
              "response_processed_bytes":0,
              "interval_seconds":60,
              "timestamp":"2022-07-26 12:56:44.459333653"
            }
        },
        {
            "Service":{
              "requested_service":"api-0.core.keybaseapi.com:443",
              "request_processed_bytes":1473,
              "response_processed_bytes":0,
              "interval_seconds":60,
              "timestamp":"2022-07-26 12:56:44.459333653"
            }
        },
        {
            "Gateway":{
              "gateway_id":"Fo4f4SQLdoyoGkFae5TpVhRVoXCF8UiypLVGtGjujVPf",
              "inbox_count":8,
              "timestamp":"2022-07-26 12:46:34.148075290"
            }
        },
        {
            "Gateway":{
              "gateway_id":"2BuMSfMW3zpeAjKXyKLhmY4QW1DXurrtSPEJ6CjX3SEh",
              "inbox_count":6,
              "timestamp":"2022-07-26 12:46:51.578765358"
            }
        },
        {
            "Gateway":{
              "gateway_id":"Fo4f4SQLdoyoGkFae5TpVhRVoXCF8UiypLVGtGjujVPf",
              "inbox_count":8,
              "timestamp":"2022-07-26 12:47:34.149270862"
            }
        }
      ]                            

Upgrading your gateway

  • pause your gateway process
  • replace the existing binary with the newest binary (which you can either compile yourself or grab from our releases page)
  • re-run init to pull in changes to config.toml. init will never overwrite keys so don’t worry about your address changing.
  • restart your gateway process with the new binary.
  • rebond your gateway, updating the version number.

Do not use the upgrade command: there is a known error with the command that will be fixed in a subsequent release.

VPS Setup and Automation

Configure your firewall

Although your gateway is now ready to receive traffic, your server may not be - the following commands will allow you to set up a properly configured firewall using ufw:

# check if you have ufw installed
ufw version
# if it is not installed, install with
sudo apt install ufw -y
# enable ufw
sudo ufw enable
# check the status of the firewall
sudo ufw status

Finally open your gateway’s p2p port, as well as ports for ssh and incoming traffic connections:

sudo ufw allow 1789,22,9000/tcp
# check the status of the firewall
sudo ufw status

For more information about your gateway’s port configuration, check the gateway port reference table below.

Automating your gateway with systemd

Although it’s not totally necessary, it’s useful to have the gateway automatically start at system boot time. Here’s a systemd service file to do that:

[Unit]
Description=Nym Gateway (v1.1.12)
StartLimitInterval=350
StartLimitBurst=10

[Service]
User=nym
LimitNOFILE=65536
ExecStart=/home/nym/nym-gateway run --id supergateway
KillSignal=SIGINT
Restart=on-failure
RestartSec=30

[Install]
WantedBy=multi-user.target

Put the above file onto your system at /etc/systemd/system/nym-gateway.service.

If you want to enable statistics mode, the start command would be: ExecStart=/home/nym/nym-gateway run --id supergateway --enabled-statistics true

Change the path in ExecStart to point at your gateway binary (nym-gateway), and the User so it is the user you are running as.

If you have built nym on your server, and your username is jetpanther, then the start command might look like this:

ExecStart=/home/jetpanther/nym/target/release/nym-gateway run --id your-id. Basically, you want the full /path/to/nym-gateway run --id whatever-your-node-id-is

Then run:

systemctl enable nym-gateway.service

Start your node:

service nym-gateway start

This will cause your node to start at system boot time. If you restart your machine, the node will come back up automatically.

You can also do service nym-gateway stop or service nym-gateway restart.

Note: if you make any changes to your systemd script after you’ve enabled it, you will need to run:

systemctl daemon-reload

This lets your operating system know it’s ok to reload the service configuration.

Numerous gateway related API endpoints are documented on the Validator API’s Swagger Documentation. There you can also try out various requests from your broswer, and download the response from the API. Swagger will also show you what commands it is running, so that you can run these from an app or from your CLI if you prefer.

Ports

All gateway specific port configuration can be found in $HOME/.nym/gateways/<your-id>/config/config.toml. If you do edit any port configs, remember to restart your gateway.

Gateway port reference

Default portUse
1789Listen for Mixnet traffic
9000Listen for Client traffic
Last change: 2023-03-21, commit: c0ca04f

Network Requesters

The Nym network requester was built in the building nym section. If you haven’t yet built Nym and want to run the code on this page, go there first.

If you have access to a server, you can run the network requester, which allows Nym users to send outbound requests from their local machine through the mixnet to a server, which then makes the request on their behalf, shielding them (and their metadata) from clearnet, untrusted and unknown infrastructure, such as email or message client servers.

As of v1.1.10, the network requester longer requires a separate nym client instance for it to function, as it has a client embedded within the binary running as a single process.

Network Requester Whitelist

The network requester is not an open proxy. It uses a file called allowed.list (located in ~/.nym/service-providers/network-requester/<network-requester-id>/) as a whitelist for outbound requests.

Any request to a URL which is not on this list will be blocked.

On startup, if this file is not present, the requester will grab the default whitelist from here automatically.

This default whitelist is useful for knowing that the majority of network requesters are able to support certain apps ‘out of the box’.

Operators of a network requester are of course free to edit this file and add the URLs of services they wish to support to it! You can find instructions below on adding your own URLs or IPs to this list.

The domains and IPs on the default whitelist can be broken down by application as follows:

# Keybase
keybaseapi.com
s3.amazonaws.com
amazonaws.com
twitter.com
keybase.io
gist.githubusercontent.com

# Used to for uptime healthcheck (see the section on testing your requester below for more)
nymtech.net

# Blockstream Green Bitcoin Wallet
blockstream.info
blockstream.com
greenaddress.it

# Electrum Bitcoin Wallet
electrum.org

# Helios Ethereum Client
alchemy.com
lightclientdata.org
p2pify.com

# Telegram - these IPs have been copied from https://core.telegram.org/resources/cidr.txt as Telegram does
# not seem to route by domain as the other apps on this list do
91.108.56.0/22
91.108.4.0/22
91.108.8.0/22
91.108.16.0/22
91.108.12.0/22
149.154.160.0/20
91.105.192.0/23
91.108.20.0/22
185.76.151.0/24
2001:b28:f23d::/48
2001:b28:f23f::/48
2001:67c:4e8::/48
2001:b28:f23c::/48
2a0a:f280::/32

Network Requester Directory

You can find a list of Network Requesters running the default whitelist here. This list comprises of the NRs running as infrastructure for NymConnect.

We are currently working on a smart-contract based solution more in line with how Mix nodes and Gateways annouce themselves to the network.

Initializing and running your network requester (standard mode)

Caution

If you are following these instructions to set up a requester as part of a Service Grant, ignore these instructions and jump to the step below

The network-requester needs to be initialized before it can be run. This is required for the embedded nym-client to connect successfully to the mixnet. We want to specify an `id` using the `--id` command and give it a value of your choosing. The following command will achieve that:
 ./nym-network-requester init --id example

Now that we have initialized our network-requester, we can start it with the following command:

 ./nym-network-requester run --id example

Expected output:

Console output

      _ __  _   _ _ __ ___
     | '_ \| | | | '_ \ _ \
     | | | | |_| | | | | | |
     |_| |_|\__, |_| |_| |_|
            |___/

             (nym-network-requester - version v1.1.12)


Initialising client...
Registering with new gateway
 2023-02-23T11:56:42.370Z INFO  gateway_client::client > the gateway is using exactly the same protocol version as we are. We're good to continue!
 2023-02-23T11:56:42.375Z INFO  config                 > Configuration file will be saved to "/Users/myusername/.nym/service-providers/network-requester/example/config/config.toml"
Saved configuration file to "/Users/myusername/.nym/service-providers/network-requester/example/config/config.toml"
Using gateway: 3zd3wrCK8Dz5TXrcvk5dG5s9EEdf4Ck1v9VgBPMMFVkR
Client configuration completed.

Version: v1.1.12
ID: example
Identity key: 3wqJJb1Xj9876KBPnGuSZnN5pCWH6id6wkzS2tL6eZEh
Encryption: 4KfgDmFhwbzLBWcnSEGKgTxGwfJzGqofSVTJKiAcokNX
Gateway ID: 3zd3wrCK8Dz5TXrcvk5dG5s9EEdf4Ck1v9VgBPMMFVkR
Gateway: ws://116.203.88.95:9000

The address of this client is: 3wqJJb1Xj9876KBPnGuSZnN5pCWH6id6wkzS2tL6eZEh.4KfgDmFhwbzLBWcnSEGKgTxGwfJzGqofSVTJKiAcokNX@3zd3wrCK8Dz5TXrcvk5dG5s9EEdf4Ck1v9VgBPMMFVkR

When running the above commands, the ./nym-network-requester --help command can be used to show a list of available parameters.

Running your network requester (stats mode)

Once an network-requester has been initialized, we can start it with the following command.

 ./nym-network-requester run --id example --enable-statistics

Expected output:

Console output

      _ __  _   _ _ __ ___
     | '_ \| | | | '_ \ _ \
     | | | | |_| | | | | | |
     |_| |_|\__, |_| |_| |_|
            |___/

             (nym-network-requester - version v1.1.12)


THE NETWORK REQUESTER STATISTICS ARE ENABLED. IT WILL COLLECT AND SEND ANONYMIZED STATISTICS TO A CENTRAL SERVER. PLEASE QUIT IF YOU DON'T WANT THIS TO HAPPEN AND START WITHOUT THE enable-statistics FLAG .


 2023-02-23T12:08:18.296Z INFO  nym_network_requester::cli::run > Starting socks5 service provider

The --enable-statistics flag starts the node in a mode which reports very minimal usage statistics - the amount of bytes sent to a service, and the number of requests - to a service we run, as part of the Nym Connect Beta testing.

Use the following command to ping our stats service to see what it has recorded (remember to change the 'until' date):

curl -d '{"since":"2022-07-26T12:46:00.000000+00:00", "until":"2022-07-26T12:57:00.000000+00:00"}' -H "Content-Type: application/json" -X POST http://mainnet-stats.nymte.ch:8090/v1/all-statistics

Expected output:

Console output

      [
        {
            "Service":{
              "requested_service":"chat-0.core.keybaseapi.com:443",
              "request_processed_bytes":294,
              "response_processed_bytes":0,
              "interval_seconds":60,
              "timestamp":"2022-07-26 12:55:44.459257091"
            }
        },
        {
            "Service":{
              "requested_service":"chat-0.core.keybaseapi.com:443",
              "request_processed_bytes":890,
              "response_processed_bytes":0,
              "interval_seconds":60,
              "timestamp":"2022-07-26 12:56:44.459333653"
            }
        },
        {
            "Service":{
              "requested_service":"api-0.core.keybaseapi.com:443",
              "request_processed_bytes":1473,
              "response_processed_bytes":0,
              "interval_seconds":60,
              "timestamp":"2022-07-26 12:56:44.459333653"
            }
        },
        {
            "Gateway":{
              "gateway_id":"Fo4f4SQLdoyoGkFae5TpVhRVoXCF8UiypLVGtGjujVPf",
              "inbox_count":8,
              "timestamp":"2022-07-26 12:46:34.148075290"
            }
        },
        {
            "Gateway":{
              "gateway_id":"2BuMSfMW3zpeAjKXyKLhmY4QW1DXurrtSPEJ6CjX3SEh",
              "inbox_count":6,
              "timestamp":"2022-07-26 12:46:51.578765358"
            }
        },
        {
            "Gateway":{
              "gateway_id":"Fo4f4SQLdoyoGkFae5TpVhRVoXCF8UiypLVGtGjujVPf",
              "inbox_count":8,
              "timestamp":"2022-07-26 12:47:34.149270862"
            }
        }
      ]

Upgrading your network requester

You can upgrade your network requester by following these steps:

  • stop your network requester service
  • replace the old binary with the new binary
  • restart your service using the commands in the previous section of the document

Upgrading to version 1.1.10

In the previous version of the network-requester, users were required to run a nym-client along side it to function. As of v1.1.10, the network-requester now has a nym client embedded into the binary, so it can run standalone.

If you are running an existing network requester registered with nym-connect, upgrading requires you move your old keys over to the new network requester configuration. We suggest following these instructions carefully to ensure a smooth transition.

Initiate the new network requester:

nym-network-requester init --id mynetworkrequester

Copy the old keys from your client to the network-requester configuration that was created above:

cp -vr ~/.nym/clients/myoldclient/data/* ~/.nym/service-providers/network-requester/mynetworkrequester/data

Edit the gateway configuration to match what you used on your client. Specifically, edit the configuration file at:

~/.nym/service-providers/network-requester/mynetworkrequester/config/config.toml

Ensure that the fields gateway_id, gateway_owner, gateway_listener in the new config match those in the old client config at:

~/.nym/clients/myoldclient/config/config.toml

Automating your network requester with systemd

Stop the running process with CTRL-C, and create a service file for the requester as we did with our client instance previously at /etc/systemd/system/nym-network-requester.service:

[Unit]
Description=Nym Network Requester (v1.1.12)
StartLimitInterval=350
StartLimitBurst=10

[Service]
User=nym # replace this with whatever user you wish
LimitNOFILE=65536
# remember to add the `--enable-statistics` flag if running as part of a service grant and check the path to your nym-network-requester binary
ExecStart=/home/nym/nym-network-requester run --id <your_id>
KillSignal=SIGINT
Restart=on-failure
RestartSec=30

[Install]
WantedBy=multi-user.target

Now enable and start your requester:

systemctl enable nym-network-requester.service
systemctl start nym-network-requester.service

# you can always check your requester has succesfully started with:
systemctl status nym-network-requester.service

VPS Setup

Configure your firewall

Although your requester is now ready to receive traffic, your server may not be - the following commands will allow you to set up a properly configured firewall using ufw:

# check if you have ufw installed
ufw version
# if it is not installed, install with
sudo apt install ufw -y
# enable ufw
sudo ufw enable
# check the status of the firewall
sudo ufw status

Finally open your requester’s p2p port, as well as ports for ssh and incoming traffic connections:

sudo ufw allow 1789,22,9000/tcp
# check the status of the firewall
sudo ufw status

For more information about your requester’s port configuration, check the requester port reference table below.

Using your network requester

Caution

Service Grant grantees should only whitelist a single application - edit your allowed.list accordingly!

Is this safe to do? If it was an open proxy, this would be unsafe, because any Nym user could make network requests to any system on the internet.

To make things a bit less stressful for administrators, the Network Requester drops all incoming requests by default. In order for it to make requests, you need to add specific domains to the allowed.list file at $HOME/.nym/service-providers/network-requester/allowed.list.

Supporting custom domains with your network requester

It is easy to add new domains and services to your network requester - simply find out which endpoints (both URLs and raw IP addresses are supported) you need to whitelist, and then add these endpoints to your allowed.list as such:

cp service-providers/network-requester/allowed.list.sample ~/.nym/service-providers/network-requester/allowed.list

Those URLs will let through requests for the Blockstream Green and Electrum cryptocurrency wallets, as well as the KeyBase chat client.

If you change your allowed.list, make sure you restart the nym-network-requester.service to pick up the new allowed request list

Adding URLs for other clients

It would suck if Nym was restricted to only three clients. How can we add support for a new application? It’s fairly easy to do.

Have a look in your nym-network-requester config directory:

ls $HOME/.nym/service-providers/network-requester/

# returns: allowed.list  unknown.list

We already know that allowed.list is what lets requests go through. All unknown requests are logged to unknown.list. If you want to try using a new client type, just start the new application, point it at your local SOCKS5 proxy (configured to use your remote nym-network-requester), and keep copying URLs from unknown.list into allowed.list (it may take multiple tries until you get all of them, depending on the complexity of the application).

If you add support for a new application, we’d love to hear about it: let us know or submit a commented pull request on allowed.list.sample.

If you are adding custom domains, please note that whilst they may appear in the logs of your network-requester as something like api-0.core.keybaseapi.com:443, you only need to include the main domain name, in this instance keybaseapi.com

Running an open proxy

If you really want to run an open proxy, perhaps for testing purposes for your own use or among a small group of trusted friends, it is possible to do so. You can disable network checks by passing the flag --open-proxy flag when you run it. If you run in this configuration, you do so at your own risk.

Testing your network requester

  1. Add nymtech.net to your allowed.list (remember to restart your network requester).

  2. Ensure that your network-requester is initialized and running.

  3. In another terminal window, run the following:

curl -x socks5h://localhost:1080 https://nymtech.net/.wellknown/connect/healthcheck.json

This command should return the following:

{ "status": "ok" }

Ports

Requester port reference

All network-requester-specific port configuration can be found in $HOME/.nym/service-providers/network-requester/<YOUR_ID>/config/config.toml. If you do edit any port configs, remember to restart your client and requester processes.

Default portUse
9000Listen for Client traffic
Last change: 2023-03-21, commit: c0ca04f

Validators

The validator is built using Cosmos SDK and Tendermint, with a CosmWasm smart contract controlling the directory service, node bonding, and delegated mixnet staking.

Building your validator

Prerequisites

  • git
sudo apt update
sudo apt install git

Verify git is installed with:

git version
# Should return: git version X.Y.Z
  • Go

Go can be installed via the following commands (taken from the Agoric SDK docs):

# First remove any existing old Go installation
sudo rm -rf /usr/local/go

# Install correct Go version
curl https://dl.google.com/go/go1.19.2.linux-amd64.tar.gz | sudo tar -C/usr/local -zxvf -

# Update environment variables to include go
cat <<'EOF' >>$HOME/.profile
export GOROOT=/usr/local/go
export GOPATH=$HOME/go
export GO111MODULE=on
export PATH=$PATH:/usr/local/go/bin:$HOME/go/bin
EOF
source $HOME/.profile

Verify Go is installed with:

go version
# Should return: go version go1.19.2 linux/amd64
  • gcc

gcc can be installed with:

sudo apt install build-essential
# Optional additional manual pages can be installed with:
sudo apt-get install manpages-dev

Verify gcc is installed with:

gcc --version

Which should return something like:

gcc (Ubuntu 7.4.0-1ubuntu1~18.04) 7.4.0
Copyright (C) 2017 Free Software Foundation, Inc.
This is free software; see the source for copying conditions.  There is NO
warranty; not even for MERCHANTABILITY or FITNESS FOR A PARTICULAR PURPOSE.

Building your validator

We use the wasmd version of the Cosmos validator to run our blockchain. First define the correct variables by selecting the correct network below, as the instructions, files, and endpoints differ in the instructions from here on in:

# Mainnet 
BECH32_PREFIX=n
WASMD_VERSION=v0.26.1
NYM_APP_NAME=nyxd
# Sandbox
BECH32_PREFIX=nymt
WASMD_VERSION=v0.26.1
NYM_APP_NAME=nymd

Then run this to clone, compile, and build your validator:

git clone https://github.com/nymtech/nyxd.git
cd nyxd
git checkout ${WASMD_VERSION}
mkdir build
go build -o ./build/${NYM_APP_NAME} -mod=readonly -tags "netgo,ledger" -ldflags "-X github.com/cosmos/cosmos-sdk/version.Name=${NYM_APP_NAME} -X github.com/cosmos/cosmos-sdk/version.AppName=${NYM_APP_NAME} -X github.com/CosmWasm/wasmd/app.NodeDir=.${NYM_APP_NAME} -X github.com/cosmos/cosmos-sdk/version.Version=${WASMD_VERSION} -X github.com/cosmos/cosmos-sdk/version.Commit=2582f0aab7b2cbf66ade066fe570a4622cf0b098 -X github.com/CosmWasm/wasmd/app.Bech32Prefix=${BECH32_PREFIX} -X \"github.com/cosmos/cosmos-sdk/version.BuildTags=netgo,ledger\"" -trimpath ./cmd/wasmd

At this point, you will have a copy of the nymd (for sandbox) or nyxd (for mainnet) binary in your build/ directory. Test that it’s compiled properly by running:

./build/${NYM_APP_NAME}

You should see help text print out.

Both the nymd or nyxd binary and the libwasmvm.so shared object library binary have been compiled. libwasmvm.so is the wasm virtual machine which is needed to execute smart contracts.

Caution

If you have compiled these files locally you need to upload both of them to the server on which the validator will run. If you have instead compiled them on the server skip to the step outlining setting LD_LIBRARY PATH below.

To locate these files on your local system run (replace nyxd with nymd for Sandbox testnet builds):

WASMVM_SO=$(ldd build/nyxd | grep libwasmvm.so | awk '{ print $3 }')
ls ${WASMVM_SO}      

This will output something like:

'/home/username/go/pkg/mod/github.com/!cosm!wasm/wasmvm@v0.13.0/api/libwasmvm.so'

Note

if you are on Mac OSX use this command instead:

WASMVM_SO=$(otool -L build/nymd | grep libwasmvm.so | awk '{ print $3 }')
ls ${WASMVM_SO}

To get the location of the libwasmvm.so file.

When you upload your nymd/nyxd binary, you’ll need to tell it where libwasmvm.so is when you start your validator, or it will not run. If you have compiled them on your server then this is not necessary, as the compiled nymd/nyxd already has access to libwasmvm.so.

Upload both nymd/nyxd and libwasmvm.so to your validator machine. If nymd/nyxd can’t find libwasmvm.so you will see an error like the following:

./nyxd: error while loading shared libraries: libwasmvm.so: cannot open shared object file: No such file or directory

You’ll need to set LD_LIBRARY_PATH in your user’s ~/.bashrc file, and add that to our path. Replace /home/youruser/path/to/nym/binaries in the command below to the locations of nymd and libwasmvm.so and run it. If you have compiled these on the server, they will be in the build/ folder:

NYX_BINARIES=/home/youruser/path/to/nym/binaries
# if you are using another shell like zsh replace '.bashrc' with the relevant config file
echo 'export LD_LIBRARY_PATH=${LD_LIBRARY_PATH}:'NYX_BINARIES >> ~/.bashrc 
echo 'export PATH=$PATH:'${NYX_BINARIES} >> ~/.bashrc
source ~/.bashrc

Test everything worked:

# Mainnet 
nyxd
# Sandbox 
nymd

This should return the regular help text.

Initialising your validator

Prerequisites:

  • FQDN Domain name
  • IPv4 and IPv6 connectivity

Choose a name for your validator and use it in place of <ID> in the following command:

nyxd init <ID> --chain-id=nyx 

Caution

init generates priv_validator_key.json and node_key.json.

If you have already set up a validator on a previous testnet, make sure to back up the key located at ~/.nymd/config/priv_validator_key.json.

If you don’t save the validator key, then it can’t sign blocks and will be jailed all the time, and there is no way to deterministically (re)generate this key.

At this point, you have a new validator, with its own genesis file located at $HOME/${NYM_APP_NAME}/config/genesis.json. You will need to replace the contents of that file that with either the Nyx Mainnet genesis file or Sandbox Sandbox Testnet genesis file.

You can use the following command to download them for the correct network:

# Mainnet 
wget  -O $HOME/.nyxd/config/genesis.json https://nymtech.net/genesis/genesis.json
# Sandbox Testnet
wget  -O $HOME/.nymd/config/genesis.json https://nymtech.net/testnets/sandbox/genesis.json

config.toml configuration

Edit the following config options in $HOME/.nyxd/config/config.toml to match the information below for your network:

# Mainnet
persistent_peers = "ee03a6777fb76a2efd0106c3769daaa064a3fcb5@51.79.21.187:26656" 
create_empty_blocks = false 
laddr = "tcp://0.0.0.0:26656" 
# Sandbox Testnet 
cors_allowed_origins = ["*"] 
persistent_peers = "d24ee58d85a65d34ad5adfc3302c3614b36e8b14@sandbox-validator.nymtech.net:26656" 
create_empty_blocks = false 
laddr = "tcp://0.0.0.0:26656" 

These affect the following:

  • persistent_peers = "<PEER_ADDRESS>@<DOMAIN>.nymtech.net:26656" allows your validator to start pulling blocks from other validators
  • create_empty_blocks = false will save space
  • laddr = "tcp://0.0.0.0:26656" is in your p2p configuration options

Optionally, if you want to enable Prometheus metrics then the following must also match in the config.toml:

  • prometheus = true
  • prometheus_listen_addr = ":26660"

Remember to enable metrics in the ‘Configuring Prometheus metrics’ section below as well.

And if you wish to add a human-readable moniker to your node:

  • moniker = "yourname"

Finally, if you plan on using Cockpit on your server, change the grpc port from 9090 as this is the port used by Cockpit.

app.toml configuration

In the file $HOME/.${NYM_APP_NAME}/config/app.toml, set the following values:

# Mainnet 
minimum-gas-prices = "0.025unym" 
enable = true in the `[api]` section to get the API server running
# Sandbox Testnet
minimum-gas-prices = "0.025unymt" 
enable = true` in the `[api]` section to get the API server running

Setting up your validator’s admin user

You’ll need an admin account to be in charge of your validator. Set that up with:

${NYM_APP_NAME} keys add nyxd-admin

This will add keys for your administrator account to your system’s keychain and log your name, address, public key, and mnemonic. As the instructions say, remember to write down your mnemonic.

You can get the admin account’s address with:

${NYM_APP_NAME} keys show nyxd-admin -a

Type in your keychain password, not the mnemonic, when asked.

Starting your validator

Everything should now be ready to go. You’ve got the validator set up, all changes made in config.toml and app.toml, the Nym genesis file copied into place (replacing the initial auto-generated one). Now let’s validate the whole setup:

${NYM_APP_NAME} validate-genesis

If this check passes, you should receive the following output:

File at /path/to/genesis.json is a valid genesis file

If this test did not pass, check that you have replaced the contents of /path/to/.nymd/config/genesis.json with that of the correct genesis file.

Before starting the validator, we will need to open the firewall ports:

# if ufw is not already installed:
sudo apt install ufw
sudo ufw enable
sudo ufw allow 1317,26656,26660,22,80,443/tcp
# to check everything worked
sudo ufw status

Ports 22, 80, and 443 are for ssh, http, and https connections respectively. The rest of the ports are documented here.

For more information about your validator’s port configuration, check the validator port reference table below.

If you are planning to use Cockpit on your validator server then you will have defined a different grpc port in your config.toml above: remember to open this port as well.

Start the validator:

${NYM_APP_NAME} start

Once your validator starts, it will start requesting blocks from other validators. This may take several hours. Once it’s up to date, you can issue a request to join the validator set with the command below.

If you are having trouble upgrading your validator binary, try replacing (or re-compile) the libwasmvm.so file and replace it on your validator server.

Caution

When joining consensus, make sure that you do not disrupt (or worse - halt) the network by coming in with a disproportionately large amount of staked tokens.

Please initially stake a small amount of tokens compared to existing validators, then delegate to yourself in tranches over time.

# Mainnet 
nyxd tx staking create-validator
  --amount=10000000unyx
  --fees=0unyx 
  --pubkey=$(/home/youruser/path/to/nyxd/binaries/nyxd tendermint show-validator | jq -r '.["key"]')
  --moniker="whatever you called your validator"
  --chain-id=nyx
  --commission-rate="0.10"
  --commission-max-rate="0.20"
  --commission-max-change-rate="0.01"
  --min-self-delegation="1"
  --gas="auto"
  --gas-adjustment=1.15
  --from="KEYRING_NAME"
  --node https://rpc-1.nyx.nodes.guru:443     
# Sandbox Testnet 
nymd tx staking create-validator
  --amount=10000000unyxt
  --fees=5000unyxt
  --pubkey=$(/home/youruser/path/to/nym/binaries/nymd tendermint show-validator)
  --moniker="whatever you called your validator"
  --chain-id=nym-sandbox
  --commission-rate="0.10"
  --commission-max-rate="0.20"
  --commission-max-change-rate="0.01"
  --min-self-delegation="1"
  --gas="auto"
  --gas-adjustment=1.15
  --from="KEYRING_NAME"
  --node https://sandbox-validator.nymtech.net:443 

You’ll need either unyxt tokens on Sandbox, or unyx tokens on mainnet to perform this command.

We are currently working towards building up a closed set of reputable validators. You can ask us for coins to get in, but please don’t be offended if we say no - validators are part of our system’s core security and we are starting out with people we already know or who have a solid reputation.

If you want to edit some details for your node you will use a command like this:

# Mainnet
nymd tx staking edit-validator   
  --chain-id=nym   
  --moniker="whatever you called your validator"
  --details="Nym validator"   
  --security-contact="your email"   
  --identity="your identity"   
  --gas="auto"   
  --gas-adjustment=1.15   
  --from="KEYRING_NAME"
  --fees 2000unyx
# Sandbox Testnet
nymd tx staking edit-validator   
  --chain-id=nym-sandbox   
  --moniker="whatever you called your validator"
  --details="Nym validator"   
  --security-contact="your email"   
  --identity="your identity"   
  --gas="auto"   
  --gas-adjustment=1.15   
  --from="KEYRING_NAME"
  --fees 2000unyxt

With above command you can specify the gpg key last numbers (as used in keybase) as well as validator details and your email for security contact.

Automating your validator with systemd

You will most likely want to automate your validator restarting if your server reboots. Below is a systemd unit file to place at /etc/systemd/system/nymd.service:

[Unit]
Description=Nymd (1.1.0)
StartLimitInterval=350
StartLimitBurst=10

[Service]
User=nym                                                          # change to your user
Type=simple
Environment="LD_LIBRARY_PATH=/home/youruser/path/to/nym/binaries" # change to correct path
ExecStart=/home/youruser/path/to/nym/binaries/nymd start          # change to correct path
Restart=on-failure
RestartSec=30
LimitNOFILE=infinity

[Install]
WantedBy=multi-user.target

Proceed to start it with:

systemctl daemon-reload # to pickup the new unit file
systemctl enable nymd   # to enable the service
systemctl start nymd    # to actually start the service
journalctl -f           # to monitor system logs showing the service start

Installing and configuring nginx for HTTPS

Setup

Nginx is an open source software used for operating high-performance web servers. It allows us to set up reverse proxying on our validator server to improve performance and security.

Install nginx and allow the ‘Nginx Full’ rule in your firewall:

sudo ufw allow 'Nginx Full'

Check nginx is running via systemctl:

systemctl status nginx

Which should return:

● nginx.service - A high performance web server and a reverse proxy server
   Loaded: loaded (/lib/systemd/system/nginx.service; enabled; vendor preset: enabled)
   Active: active (running) since Fri 2018-04-20 16:08:19 UTC; 3 days ago
     Docs: man:nginx(8)
 Main PID: 2369 (nginx)
    Tasks: 2 (limit: 1153)
   CGroup: /system.slice/nginx.service
           ├─2369 nginx: master process /usr/sbin/nginx -g daemon on; master_process on;
           └─2380 nginx: worker process

Configuration

Proxying your validator’s port 26657 to nginx port 80 can then be done by creating a file with the following at /etc/nginx/conf.d/validator.conf:

server {
  listen 80;
  listen [::]:80;
  server_name "";

  location / {
    proxy_pass http://127.0.0.1:26657;
    proxy_set_header X-Real-IP $remote_addr;
    proxy_set_header Host $host;
    proxy_set_header X-Forwarded-For $proxy_add_x_forwarded_for;
  }
}

Followed by:

sudo apt install certbot nginx python3
certbot --nginx -d nym-validator.yourdomain.com -m you@yourdomain.com --agree-tos --noninteractive --redirect

Caution

If using a VPS running Ubuntu 20: replace certbot nginx python3 with python3-certbot-nginx

These commands will get you an https encrypted nginx proxy in front of the API.

Configuring Prometheus metrics (optional)

Configure Prometheus with the following commands (adapted from NodesGuru’s Agoric setup guide):

echo 'export OTEL_EXPORTER_PROMETHEUS_PORT=9464' >> $HOME/.bashrc
source ~/.bashrc
sed -i '/\[telemetry\]/{:a;n;/enabled/s/false/true/;Ta}' $HOME/.nymd/config/app.toml
sed -i "s/prometheus-retention-time = 0/prometheus-retention-time = 60/g" $HOME/.nymd/config/app.toml
sudo ufw allow 9464
echo 'Metrics URL: http://'$(curl -s ifconfig.me)':26660/metrics'

Your validator’s metrics will be available to you at the returned ‘Metrics URL’.

Console output

# HELP go_gc_duration_seconds A summary of the pause duration of garbage collection cycles.
# TYPE go_gc_duration_seconds summary
go_gc_duration_seconds{quantile="0"} 6.7969e-05
go_gc_duration_seconds{quantile="0.25"} 7.864e-05
go_gc_duration_seconds{quantile="0.5"} 8.4591e-05
go_gc_duration_seconds{quantile="0.75"} 0.000115919
go_gc_duration_seconds{quantile="1"} 0.001137591
go_gc_duration_seconds_sum 0.356555301
go_gc_duration_seconds_count 2448
# HELP go_goroutines Number of goroutines that currently exist.
# TYPE go_goroutines gauge
go_goroutines 668
# HELP go_info Information about the Go environment.
# TYPE go_info gauge
go_info{version="go1.15.7"} 1
# HELP go_memstats_alloc_bytes Number of bytes allocated and still in use.
# TYPE go_memstats_alloc_bytes gauge
go_memstats_alloc_bytes 1.62622216e+08
# HELP go_memstats_alloc_bytes_total Total number of bytes allocated, even if freed.
# TYPE go_memstats_alloc_bytes_total counter
go_memstats_alloc_bytes_total 2.09341707264e+11
# HELP go_memstats_buck_hash_sys_bytes Number of bytes used by the profiling bucket hash table.
# TYPE go_memstats_buck_hash_sys_bytes gauge
go_memstats_buck_hash_sys_bytes 5.612319e+06
# HELP go_memstats_frees_total Total number of frees.
# TYPE go_memstats_frees_total counter
go_memstats_frees_total 2.828263344e+09
# HELP go_memstats_gc_cpu_fraction The fraction of this program's available CPU time used by the GC since the program started.
# TYPE go_memstats_gc_cpu_fraction gauge
go_memstats_gc_cpu_fraction 0.03357798610671518
# HELP go_memstats_gc_sys_bytes Number of bytes used for garbage collection system metadata.
# TYPE go_memstats_gc_sys_bytes gauge
go_memstats_gc_sys_bytes 1.3884192e+07

Setting the ulimit

Linux machines limit how many open files a user is allowed to have. This is called a ulimit.

ulimit is 1024 by default on most systems. It needs to be set higher, because validators make and receive a lot of connections to other nodes.

If you see errors such as:

Failed to accept incoming connection - Os { code: 24, kind: Other, message: "Too many open files" }

This means that the operating system is preventing network connections from being made.

Set the ulimit via systemd service file

Query the ulimit of your validator with:

grep -i "open files" /proc/$(ps -A -o pid,cmd|grep nymd | grep -v grep |head -n 1 | awk '{print $1}')/limits

You’ll get back the hard and soft limits, which looks something like this:

Max open files            65536                65536                files

If your output is the same as above, your node will not encounter any ulimit related issues.

However if either value is 1024, you must raise the limit via the systemd service file. Add the line:

LimitNOFILE=65536

Reload the daemon:

systemctl daemon-reload

or execute this as root for system-wide setting of ulimit:

echo "DefaultLimitNOFILE=65535" >> /etc/systemd/system.conf

Reboot your machine and restart your node. When it comes back, use cat /proc/$(pidof nym-validator)/limits | grep "Max open files" to make sure the limit has changed to 65535.

Set the ulimit on non-systemd based distributions

Edit etc/security/conf and add the following lines:

# Example hard limit for max opened files
username        hard nofile 4096
# Example soft limit for max opened files
username        soft nofile 4096

Then reboot your server and restart your validator.

Unjailing your validator

If your validator gets jailed, you can fix it with the following command:

# Mainnet
nyxd tx slashing unjail 
  --broadcast-mode=block 
  --from="KEYRING_NAME"
  --chain-id=nyx 
  --gas=auto 
  --gas-adjustment=1.4 
  --fees=7000unyx
# Sandbox Testnet
nymd tx slashing unjail 
  --broadcast-mode=block 
  --from="KEYRING_NAME"
  --chain-id=nym-sandbox 
  --gas=auto 
  --gas-adjustment=1.4 
  --fees=7000unyxt

Common reasons for your validator being jailed

The most common reason for your validator being jailed is that your validator is out of memory because of bloated syslogs.

Running the command df -H will return the size of the various partitions of your VPS.

If the /dev/sda partition is almost full, try pruning some of the .gz syslog archives and restart your validator process.

Day 2 operations with your validator

You can check your current balances with:

nymd query bank balances ${ADDRESS}

For example, on the Sanbox testnet this would return:

balances:
- amount: "919376"
denom: unymt
pagination:
next_key: null
total: "0"

You can, of course, stake back the available balance to your validator with the following command.

Remember to save some tokens for gas costs!

# Mainnet
nyxd tx staking delegate VALOPERADDRESS AMOUNTunym 
  --from="KEYRING_NAME"
  --keyring-backend=os 
  --chain-id=nyx 
  --gas="auto" 
  --gas-adjustment=1.15 
  --fees 5000unyx
# Sandbox Testnet
nymd tx staking delegate VALOPERADDRESS AMOUNTunymt 
  --from="KEYRING_NAME"
  --keyring-backend=os 
  --chain-id=nym-sandbox
  --gas="auto" 
  --gas-adjustment=1.15 
  --fees 5000unyxt

Validator port reference

All validator-specific port configuration can be found in $HOME/.nymd/config/config.toml. If you do edit any port configs, remember to restart your validator.

Default portUse
1317REST API server endpoint
26656Listen for incoming peer connections
26660Listen for Prometheus connections
Last change: 2023-03-21, commit: c0ca04f

Troubleshooting

Binary Build Problems

I am trying to build from the GitHub archive files and the build fails

GitHub automatically includes .zip and tar.gz files of the Nym repository in its release. You cannot extract these and build - you’ll see something like this:

  process didn't exit successfully: `/build/nym/src/nym-0.12.1/target/release/build/nym-socks5-client-c1d0f76a8c7d7e9a/build-script-build` (exit status: 101)
  --- stderr
  thread 'main' panicked at 'failed to extract build metadata: could not find repository from '/build/nym/src/nym-0.12.1/clients/socks5'; class=Repository (6); code=NotFound (-3)', clients/socks5/build.rs:7:31
  note: run with `RUST_BACKTRACE=1` environment variable to display a backtrace
warning: build failed, waiting for other jobs to finish...
error: build failed

Why does this happen?

We have scripts which automatically include the Git commit hash and Git tag in the binary for easier debugging later. If you download a .zip and try building from that, it’s not a Git repository and build will fail as above.

General Node Config

Where can I find my private and public keys and config?

All config and keys files are stored in a directory named after your id which you chose during the init process, and can be found at the following PATH: $HOME/.nym/<NODE_TYPE>/<NODE_ID> where $HOME is a home directory of the user (your current user in this case) that launched the node or client.

The directory structure for each node will be roughly as follows:

bob@nym:~$ tree /home/nym/.nym/mixnodes/
/home/nym/.nym/mixnodes/
|-- nym010
|   |-- config
|   |   `-- config.toml
|   `-- data
|       |-- private_identity.pem
|       |-- private_sphinx.pem
|       |-- public_identity.pem
|       `-- public_sphinx.pem

If you cat the public_sphinx.pem key, the output will be different from the public key you will see on Nym dashboard. The reason for this is that .pem files are encoded in base64, however on the web they are in base58. Don’t be confused if your keys look different. They are the same keys, just with different encoding :)

Mix Nodes

How can I tell my node is up and running and mixing traffic?

First of all check the ‘Mixnodes’ section of either the Nym Network Explorers:

Enter your identity key to find your node. Check the contents of the ‘mixnode stats’ and ‘uptime story’ sections.

There are 2 community explorers currently, which have been created by Nodes Guru:

If you want more information, or if your node isn’t showing up on the explorer of your choice and you want to double-check, here are some examples on how to check if the node is configured properly.

Check from your VPS

Additional details can be obtained via various methods after you connect to your VPS:

Socket statistics with ss
sudo ss -s -t | grep 1789 # if you have specified a different port in your mixnode config, change accordingly

This command should return a lot of data containing ESTAB. This command should work on every unix based system.

List open files and reliant processes with lsof
# check if lsof is installed:
lsof -v
# install if not installed
sudo apt install lsof
# run against mixnode port
sudo lsof -i TCP:1789 # if you have specified a different port in your mixnode config, change accordingly

This command should return something like this:

nym-mixno 103349 root   53u  IPv6 1333229972      0t0  TCP [2a03:b0c0:3:d0::ff3:f001]:57844->[2a01:4f9:c011:38ae::5]:1789 (ESTABLISHED)
nym-mixno 103349 root   54u  IPv4 1333229973      0t0  TCP nym:57104->194.5.78.73:1789 (ESTABLISHED)
nym-mixno 103349 root   55u  IPv4 1333229974      0t0  TCP nym:48130->static.236.109.119.168.clients.your-server.de:1789 (ESTABLISHED)
nym-mixno 103349 root   56u  IPv4 1333229975      0t0  TCP nym:52548->vmi572614.contaboserver.net:1789 (ESTABLISHED)
nym-mixno 103349 root   57u  IPv6 1333229976      0t0  TCP [2a03:b0c0:3:d0::ff3:f001]:43244->[2600:1f18:1031:2401:c04b:2f25:ca79:fef3]:1789 (ESTABLISHED)
Query systemd journal with journalctl
sudo journalctl -u nym-mixnode -o cat | grep "Since startup mixed"

If you have created nym-mixnode.service file (i.e. you are running your mixnode via systemd) then this command shows you how many packets have you mixed so far, and should return a list of messages like this:

2021-05-18T12:35:24.057Z INFO  nym_mixnode::node::metrics                      > Since startup mixed 233639 packets!
2021-05-18T12:38:02.178Z INFO  nym_mixnode::node::metrics                      > Since startup mixed 233739 packets!
2021-05-18T12:40:32.344Z INFO  nym_mixnode::node::metrics                      > Since startup mixed 233837 packets!
2021-05-18T12:46:08.549Z INFO  nym_mixnode::node::metrics                      > Since startup mixed 234081 packets!
2021-05-18T12:56:57.129Z INFO  nym_mixnode::node::metrics                      > Since startup mixed 234491 packets!

You can add | tail to the end of the command to watch for new entries in real time if needed.

Check from your local machine

Scan ports with nmap:
nmap -p 1789 <IP ADDRESS> -Pn

If your mixnode is configured properly it should output something like this:

bob@desktop:~$ nmap -p 1789 95.296.134.220 -Pn

Host is up (0.053s latency).

PORT     STATE SERVICE
1789/tcp open  hello
Query online nodes:
curl --location --request GET 'https://validator.nymtech.net/api/v1/mixnodes/'

Will return a list all nodes currently online.

You can query gateways by replacing mixnodes with gateways in the above command, and can query for the mixnodes and gatways on the Sandbox testnet by replacing validator with sandbox-validator.

Check with Network API

We currently have an API set up returning our metrics tests of the network. There are two endpoints to ping for information about your mixnode, report and history. Find more information about this in the Mixnodes metrics documentation.

Why is my node not mixing any packets?

If you are still unable to see your node on the dashboard, or your node is declaring it has not mixed any packets, there are several potential issues:

  • The firewall on your host machine is not configured properly.
  • You provided incorrect information when bonding your node.
  • You are running your mixnode from a VPS without IPv6 support.
  • You did not use the --announce-host flag while running the mixnode from your local machine behind NAT.
  • You did not configure your router firewall while running the mixnode from your local machine behind NAT, or you are lacking IPv6 support.
  • Your mixnode is not running at all, it has either exited / panicked or you closed the session without making the node persistent.

Caution

Your mixnode must speak both IPv4 and IPv6 in order to cooperate with other nodes and route traffic. This is a common reason behind many errors we are seeing among node operators, so check with your provider that your VPS is able to do this!

Incorrectly configured firewall

The most common reason your mixnode might not be mixing packets is due to a poorly configured firewall. The following commands will allow you to set up a firewall using ufw.

# check if you have ufw installed
ufw version
# if it is not installed, install with
sudo apt install ufw -y
# enable ufw
sudo ufw enable
# check the status of the firewall
sudo ufw status

Finally open your mixnode’s p2p port, as well as ports for ssh, http, and https connections, and ports 8000 and 1790 for verloc and measurement pings:

sudo ufw allow 1789,1790,8000,22,80,443/tcp
# check the status of the firewall
sudo ufw status

Incorrect bonding information

Check that you have provided the correct information when bonding your mixnode in the web wallet interface. When in doubt, unbond and then rebond your node!

Missing announce-host flag

On certain cloud providers such as AWS and Google Cloud, you need to do some additional configuration of your firewall and use --host with your local ip and --announce-host with the public ip of your mixnode host.

No IPv6 connectivity

Make sure that your VPS has IPv6 connectivity available with whatever provider you are using.

To get all ip addresses of your host, try following commands:

hostname -i

Will return your local ip address.

hostname -I

Will return all of the ip addresses of your host. This output should look something like this:

bob@nym:~$ hostname -I
88.36.11.23 172.18.0.1 2a01:28:ca:102::1:641
  • The first ipv4 is the public ip you need to use for the --announce-host flag.
  • The second ipv4 is the local ip you need to use for the --host flag.
  • The 3rd output should confirm if your machine has ipv6 available.

Running on a local machine behind NAT with no fixed IP address

Your ISP has to be IPv6 ready if you want to run a mixnode on your local machine. Sadly, in 2020, most of them are not and you won’t get an IPv6 address by default from your ISP. Usually it is a extra paid service or they simply don’t offer it.

Before you begin, check if you have IPv6 here. If not, then don’t waste your time to run a node which won’t ever be able to mix any packet due to this limitation. Call your ISP and ask for IPv6, there is a plenty of it for everyone!

If all goes well and you have IPv6 available, then you will need to init the mixnode with an extra flag, --announce-host. You will also need to edit your config.toml file each time your IPv4 address changes, that could be a few days or a few weeks.

Additional configuration on your router might also be needed to allow traffic in and out to port 1789 and IPv6 support.

Here is a sample of the init command to create the mixnode config.

./target/release/nym-mixnode init --id nym-nat --host 0.0.0.0 --announce-host 85.160.12.13 --layer 3
  • --host 0.0.0.0 should work everytime even if your local machine IPv4 address changes. For example on Monday your router gives your machine an address 192.168.0.13 and on Wednesday, the DHCP lease will end and you will be asigned 192.168.0.14. Using 0.0.0.0 should avoid this without having to set any static ip in your router`s configuration.

  • you can get your current IPv4 address by either using curl ipinfo.io if you’re on MacOS or Linux or visiting whatsmyip site. Simply copy it and use it as --anounce-host address.

Make sure you check if your node is really mixing. You will need a bit of luck to set this up from your home behind NAT.

Accidentally killing your node process on exiting session

When you close your current terminal session, you need to make sure you don’t kill the mixnode process! There are multiple ways on how to make it persistent even after exiting your ssh session, the easiest solution is to use nohup, and the more elegant solution is to run the node with systemd.

Running your mixnode as a background process with nohup

nohup is a command with which your terminal is told to ignore the HUP or ‘hangup’ signal. This will stop the mixnode process ending if you kill your session.

nohup ./nym-mixnode run --id NYM # where `--id NYM` is the id you set during the `init` command.

Running your mixnode as a background process with systemd

The most reliable and elegant solution is to create a systemd.service file and run the nym-mixnode with systemctl command.

Create a file with nano at /etc/systemd/system/nym-mixnode.service containing the following:

[Unit]
Description=nym mixnode service
After=network.target

[Service]
Type=simple
User=nym                                      # change as appropriate
LimitNOFILE=65536
ExecStart=/home/nym/nym-mixnode run --id nym  # change as appropriate
KillSignal=SIGINT
Restart=on-failure
RestartSec=30
Restart=on-abort
[Install]
WantedBy=multi-user.target
# enable the service
sudo systemctl enable nym-mixnode
# start the service
sudo systemctl start nym-mixnode
# check if the service is running properly and mixnode is mixing
sudo systemctl status nym-mixnode

Now your node should be mixing all the time, and restart if you reboot your server!

Anytime you change your systemd service file you need to sudo systemctl daemon-reload in order to restart the service.

Network configuration seems fine but log still claims Since startup mixed 0 packets!

This behavior is most likely caused by a mismatch between your node configuration and the bonding information. Unbond and then rebond your node.

Also make sure to enter all the information in the web wallet exactly as it appears in the log when you start the mixnode process. In particular, the host field must contain the port on which your mixnode will listen:

  • correct host: 34.12.3.43:1789
  • incorrect host:34.12.3.43

Common errors and warnings

Most of the ERROR and WARN messages in your node logs are benign - as long as your node outputs since startup mixed X packets! in your logs (and this number increases over time), your node is mixing packets. If you want to be sure, check the Nym dashboard or see other ways on how to check if your node is mixing properly as outlined in the section How can I tell my node is up and running and mixing traffic? above.

More specific errors and warnings are covered below.

tokio runtime worker error

If you are running into issues with an error including the following:

thread 'tokio-runtime-worker' panicked at 'Failed to create TCP listener: Os { code: 99, kind: AddrNotAvailable, message: "Cannot assign requested address" }'

Then you need to --announce-host <public ip> and ``–host ` on startup. This issue arises because of your use of a provider like AWS or Google Cloud, and the fact that your VPS’ available bind address is not the same as the public IP address (see Virtual IPs and hosting via Google and AWS for more information on this issue).

rocket::launch warnings

These warnings are not an issue, please ignore them. Rocket is a web framework for rust which we are using to provide mixnodes with /verloc and /description http APIs.

Find more information about this in the Mixnodes metrics documentation.

Rocket runs on port 8000 by default. Although at this stage of the testnet we need Rocket to be reachable via this port, in the future customization of the particular port it uses will be possible.

failed to receive reply to our echo packet within 1.5s. Stopping the test

This relates to the VerLoc implementation that appeared in 0.10.1, which has a particularly high log sensitivity. This warning means that the echo packet sent to the mixnode was received, but not sent back. This will not affect the rate of rewards or performance metrics of your mixnode in the testnet at this point.

Connection to <IP>:1789 seems to be dead

This warning is normal at the moment, and is nothing to do with your mixnode! It is simply a warning that your node is unable to connect to other peoples’ mixnodes for some reason, most likely because they are offline or poorly configured.

Can I use a port other than 1789 ?

Yes! Here is what you will need to do:

Assuming you would like to use port 1337 for your mixnode, you need to open the new port (and close the old one):

sudo ufw allow 1337
sudo ufw deny 1789

And then edit the mixnode’s config.

If you want to change the port for an already running node, you need to stop the process before editing your config file.

Assuming your node name is nym, the config file is located at ~/.nym/mixnodes/nym/config/config.toml.

nano ~/.nym/mixnodes/nym/config/config.toml

You will need to edit two parts of the file. announce_address and listening_address in the config.toml file. Simply replace :1789 (the default port) with :1337 (your new port) after your IP address.

Finally, restart your node. You should see if the mixnode is using the port you have changed in the config.toml file right after you run the node.

What is verloc and do I have to configure my mixnode to implement it?

verloc is short for verifiable location. Mixnodes and gateways now measure speed-of-light distances to each other, in an attempt to verify how far apart they are. In later releases, this will allow us to algorithmically verify node locations in a non-fakeable and trustworthy manner.

You don’t have to do any additional configuration for your node to implement this, it is a passive process that runs in the background of the mixnet from version 0.10.1 onwards.

Where can I get more help?

The fastest way to reach one of us or get a help from the community, visit our Telegram help chat or head to our Discord

For more tech heavy questions join our Keybase channel. Get Keybase here, then click Teams -> Join a team. Type nymtech.friends into the team name and hit continue. For general chat, hang out in the #general channel.

Last change: 2023-03-21, commit: c0ca04f

Clients Overview

A large proportion of the Nym mixnet’s functionality is implemented client-side.

Clients perform the following actions on behalf of users:

  • determine network topology - what mixnodes exist, what their keys are, etc.
  • register with a gateway
  • authenticate with a gateway
  • receive and decrypt messages from the gateway
  • create layer-encrypted Sphinx packets
  • send Sphinx packets with real messages
  • send Sphinx packet cover traffic when no real messages are being sent
  • retransmit un-acknowledged packet sends - if a client sends 100 packets to a gateway, but only receives an acknowledgement (‘ack’) for 95 of them, it will resend those 5 packets to the gateway again, to make sure that all packets are received.

Types of Nym clients

At present, there are three Nym clients:

  • the websocket (native) client
  • the SOCKS5 client
  • the wasm (webassembly) client

You need to choose which one you want incorporate into your app. Which one you use will depend largely on your preferred programming style and the purpose of your app.

The websocket client

Your first option is the native websocket client (nym-client). This is a compiled program that can run on Linux, Mac OS X, and Windows machines. It runs as a persistent process on a desktop or server machine. You can connect to it with any language that supports websockets.

The webassembly client

If you’re working in JavaScript or Typescript in the browser, or building an edge computing app, you’ll likely want to choose the webassembly client.

It’s packaged and available on the npm registry, so you can npm install it into your JavaScript or TypeScript application.

The webassembly client is most easily used via the sdk.

The SOCKS5 client

This client (nym-socks5-client) is useful for allowing existing applications to use the Nym mixnet without any code changes. All that’s necessary is that they can use one of the SOCKS5, SOCKS4a, or SOCKS4 proxy protocols (which many applications can - crypto wallets, browsers, chat applications etc).

It’s less flexible as a way of writing custom applications than the other clients, but able to be used to proxy application traffic through the mixnet without having to make any code changes.

Commonalities between clients

All Nym client packages present basically the same capabilities to the privacy application developer. They need to run as a persistent process in order to stay connected and ready to receive any incoming messages from their gateway nodes. They register and authenticate to gateways, and encrypt Sphinx packets.

Last change: 2023-03-21, commit: c0ca04f

Websocket Client

The Nym Websocket Client was built in the building nym section. If you haven’t yet built Nym and want to run the code on this page, go there first.

Client setup

Viewing command help

You can check that your binaries are properly compiled with:

./nym-client --help

Console output


      _ __  _   _ _ __ ___
     | '_ \| | | | '_ \ _ \
     | | | | |_| | | | | | |
     |_| |_|\__, |_| |_| |_|
            |___/

             (client - version v1.1.12)

    
      nym-client v1.1.12
      Nymtech
      Implementation of the Nym Client

      USAGE:
          nym-client [OPTIONS] <SUBCOMMAND>

      OPTIONS:
              --config-env-file <CONFIG_ENV_FILE>
                  Path pointing to an env file that configures the client

          -h, --help
                  Print help information

          -V, --version
                  Print version information

      SUBCOMMANDS:
          completions          Generate shell completions
          generate-fig-spec    Generate Fig specification
          help                 Print this message or the help of the given subcommand(s)
          init                 Initialise a Nym client. Do this first!
          run                  Run the Nym client with provided configuration client optionally
                               overriding set parameters
          upgrade              Try to upgrade the client


The two most important commands you will issue to the client are:

  • init - initalise a new client instance.
  • run - run a mixnet client process.

You can check the necessary parameters for the available commands by running:

./nym-client <command> --help 

Initialising your client

Before you can use the client, you need to initalise a new instance of it. Each instance of the client has its own public/private keypair, and connects to its own gateway node. Taken together, these 3 things (public/private keypair + gateway node identity key) make up an app’s identity.

Initialising a new client instance can be done with the following command:

./nym-client init --id <client_id> 

Console output

      Initialising client...
      Saved all generated keys
      Saved configuration file to "/home/mx/.nym/clients/client/config/config.toml"
      Using gateway: BNjYZPxzcJwczXHHgBxCAyVJKxN6LPteDRrKapxWmexv
      Client configuration completed.


      The address of this client is: 7bxykcEH1uGNMr8mxGABvLJA44nbYt6Rp7xXHhJ4wQVk.HpnFbaMJ8NN1cp5ZPdPTc2GoBDnG4Jd51Sti32tbf3tF@BNjYZPxzcJwczXHHgBxCAyVJKxN6LPteDRrKapxWmexv

The --id in the example above is a local identifier so that you can name your clients; it is never transmitted over the network.

There is an optional --gateway flag that you can use if you want to use a specific gateway. The supplied argument is the Identity Key of the gateway you wish to use, which can be found on the mainnet Network Explorer or Sandbox Testnet Explorer depending on which network you are on.

Not passing this argument will randomly select a gateway for your client.

Choosing a Gateway

By default - as in the example above - your client will choose a random gateway to connect to.

However, there are several options for choosing a gateway, if you do not want one that is randomly assigned to your client:

  • If you wish to connect to a specific gateway, you can specify this with the --gateway flag when running init.
  • You can also choose a gateway based on its location relative to your client. This can be done by appending the --latency-based-routing flag to your init command. This command means that to select a gateway, your client will:
    • fetch a list of all availiable gateways
    • send few ping messages to all of them, and measure response times.
    • create a weighted distribution to randomly choose one, favouring ones with lower latency.

Note this doesn’t mean that your client will pick the closest gateway to you, but it will be far more likely to connect to gateway with a 20ms ping rather than 200ms

Configuring your client

When you initalise a client instance, a configuration directory will be generated and stored in $HOME_DIR/.nym/clients/<client-name>/.

/home/<user>/.nym/clients/<client_id>/
├── config
│   └── config.toml
└── data
    ├── private_identity.pem
    └── public_identity.pem

The config.toml file contains client configuration options, while the two pem files contain client key information.

The generated files contain the client name, public/private keypairs, and gateway address. The name <client_id> in the example above is just a local identifier so that you can name your clients.

Configuring your client for Docker

By default, the native client listens to host 127.0.0.1. However this can be an issue if you wish to run a client in a Dockerized environment, where it can be convenenient to listen on a different host such as 0.0.0.0.

You can set this via the --host flag during either the init or run commands.

Alternatively, a custom host can be set in the config.toml file under the socket section. If you do this, remember to restart your client process.

Running your client

You can run the initalised client by doing this:

./nym-client run --id <client_id>

When you run the client, it immediately starts generating (fake) cover traffic and sending it to the mixnet.

When the client is first started, it will reach out to the Nym network’s validators, and get a list of available Nym nodes (gateways, mixnodes, and validators). We call this list of nodes the network topology. The client does this so that it knows how to connect, register itself with the network, and know which mixnodes it can route Sphinx packets through.

Using your client

Connecting to the local websocket

The Nym native client exposes a websocket interface that your code connects to. To program your app, choose a websocket library for whatever language you’re using. The default websocket port is 1977, you can override that in the client config if you want.

The Nym monorepo includes websocket client example code for Rust, Go, Javacript, and Python, all of which can be found here

Rust users can run the examples with cargo run --example <rust_file>.rs, as the examples are not organised in the same way as the other examples, due to already being inside a Cargo project.

All of these code examples will do the following:

  • connect to a running websocket client on port 1977
  • format a message to send in either JSON or Binary format. Nym messages have defined JSON formats.
  • send the message into the websocket. The native client packages the message into a Sphinx packet and sends it to the mixnet
  • wait for confirmation that the message hit the native client
  • wait to receive messages from other Nym apps

By varying the message content, you can easily build sophisticated service provider apps. For example, instead of printing the response received from the mixnet, your service provider might take some action on behalf of the user - perhaps initiating a network request, a blockchain transaction, or writing to a local data store.

You can find an example of building both frontend and service provider code with the websocket client in the Simple Service Provider Tutorial in the Developer Portal.

Message Types

There are a small number of messages that your application sends up the websocket to interact with the native client, as follows.

Sending text

If you want to send text information through the mixnet, format a message like this one and poke it into the websocket:

{
  "type": "send",
  "message": "the message",
  "recipient": "71od3ZAupdCdxeFNg8sdonqfZTnZZy1E86WYKEjxD4kj@FWYoUrnKuXryysptnCZgUYRTauHq4FnEFu2QGn5LZWbm"
}

In some applications, e.g. where people are chatting with friends who they know, you might want to include unencrypted reply information in the message field. This provides an easy way for the receiving chat to then turn around and send a reply message:

{
  "type": "send",
  "message": {
    "sender": "198427b63ZAupdCdxeFNg8sdonqfZTnZZy1E86WYKEjxD4kj@FWYoUrnKuXryysptnCZgUYRTauHq4FnEFu2QGn5LZWbm",
    "chatMessage": "hi julia!"
  },
  "recipient": "71od3ZAupdCdxeFNg8sdonqfZTnZZy1E86WYKEjxD4kj@FWYoUrnKuXryysptnCZgUYRTauHq4FnEFu2QGn5LZWbm"
}

If that fits your security model, good. However, it may be the case that you want to send anonymous replies using Single Use Reply Blocks (SURBs).

You can read more about SURBs here but in short they are ways for the receiver of this message to anonymously reply to you - the sender - without them having to know your nym address.

Your client will send along a number of replySurbs to the recipient of the message. These are pre-addressed Sphinx packets that the recipient can write to, but not view the address. If the recipient is unable to fit the response data into the bucket of SURBs sent to it, it will use a SURB to request more SURBs be sent to it.

{
    "type": "sendAnonymous", 
    "message": "something you want to keep secret"
    "recipient": "71od3ZAupdCdxeFNg8sdonqfZTnZZy1E86WYKEjxD4kj@FWYoUrnKuXryysptnCZgUYRTauHq4FnEFu2QGn5LZWbm"
    "replySurbs": 100 // however many reply SURBs to send along with your message
}

Each bucket of replySURBs, when received as part of an incoming message, has a unique session identifier, which only identifies the bucket of pre-addressed packets. This is necessary to make sure that your app is replying to the correct people with the information meant for them! Constructing a reply with SURBs looks something like this (where senderTag was parsed from the incoming message)

{
    "type": "reply", 
    "message": "reply you also want to keep secret", 
    "senderTag": "the sender tag you parsed from the incoming message"
}

Sending binary data

You can also send bytes instead of JSON. For that you have to send a binary websocket frame containing a binary encoded Nym ClientRequest containing the same information.

As a response the native-client will send a ServerResponse to be decoded.

You can find examples of sending and receiving binary data in the Rust, Python and Go code examples, and an example project from the Nym community BTC-BC: Bitcoin transaction transmission via Nym, a client and service provider written in Rust.

Getting your own address

Sometimes, when you start your app, it can be convenient to ask the native client to tell you what your own address is (from the saved configuration files). To do this, send:

{
  "type": "selfAddress"
}

You’ll get back:

{
  "type": "selfAddress",
  "address": "the-address" // e.g. "71od3ZAupdCdxeFNg8sdonqfZTnZZy1E86WYKEjxD4kj@FWYoUrnKuXryysptnCZgUYRTauHq4FnEFu2QGn5LZWbm"
}

Error messages

Errors from the app’s client, or from the gateway, will be sent down the websocket to your code in the following format:

{
  "type": "error",
  "message": "string message"
}
Last change: 2023-03-21, commit: c0ca04f

Socks5 Client

The Nym socks5 client was built in the building nym section. If you haven’t yet built Nym and want to run the code on this page, go there first.

Many existing applications are able to use either the SOCKS4, SOCKS4A, or SOCKS5 proxy protocols. If you want to send such an application’s traffic through the mixnet, you can use the nym-socks5-client to bounce network traffic through the Nym network, like this:

                                                                              External Systems:
                                                                                     +--------------------+
                                                                             |------>| Monero blockchain  |
                                                                             |       +--------------------+
                                                                             |       +--------------------+
                                                                             |------>|    Email server    |
                                                                             |       +--------------------+
                                                                             |       +--------------------+
                                                                             |------>|    RPC endpoint    |
                                                                             |       +--------------------+
                                                                             |       +--------------------+
                                                                             |------>|       Website      |
                                                                             |       +--------------------+
                                                                             |       +--------------------+
  +----------------------------------+                                       |------>|       etc...       |
  | Mixnet:                          |                                       |       +--------------------+
  |       * Gateway your client is   |                                       |
  |       connected to               |          +--------------------+       |
  |       * Mix nodes 1 -> 3         |<-------->| Network requester  |<------+
  |       * Gateway that network     |          +--------------------+
  |       requester is connected to  |
  +----------------------------------+
           ^
           |
           |
           |
           |
           v
 +-------------------+
 | +---------------+ |
 | |  Nym client   | |
 | +---------------+ |
 |         ^         |
 |         |         |
 |         |         |
 |         |         |
 |         v         |
 | +---------------+ |
 | | Your app code | |
 | +---------------+ |
 +-------------------+
  Your Local Machine

There are 2 pieces of software that work together to send SOCKS traffic through the mixnet: the nym-socks5-client, and the nym-network-requester.

The nym-socks5-client allows you to do the following from your local machine:

  • Take a TCP data stream from a application that can send traffic via SOCKS5.
  • Chop up the TCP stream into multiple Sphinx packets, assigning sequence numbers to them, while leaving the TCP connection open for more data
  • Send the Sphinx packets through the mixnet to a network requester. Packets are shuffled and mixed as they transit the mixnet.

The nym-network-requester then reassembles the original TCP stream using the packets’ sequence numbers, and make the intended request. It will then chop up the response into Sphinx packets and send them back through the mixnet to your nym-socks5-client. The application will then receive its data, without even noticing that it wasn’t talking to a “normal” SOCKS5 proxy!

Client setup

Viewing command help

You can check that your binaries are properly compiled with:

./nym-socks5-client --help

Console output


    | '_ \| | | | '_ \ _ \
    | | | | |_| | | | | | |
    |_| |_|\__, |_| |_| |_|
            |___/

            (socks5 proxy - version v1.1.12)


    nym-socks5-client v1.1.12
    Nymtech
    A SOCKS5 localhost proxy that converts incoming messages to Sphinx and sends them to a Nym address

    USAGE:
    nym-socks5-client [OPTIONS] <SUBCOMMAND>

    OPTIONS:
            --config-env-file <CONFIG_ENV_FILE>
            Path pointing to an env file that configures the client

    -h, --help
            Print help information

    -V, --version
            Print version information

    SUBCOMMANDS:
    completions          Generate shell completions
    generate-fig-spec    Generate Fig specification
    help                 Print this message or the help of the given subcommand(s)
    init                 Initialise a Nym client. Do this first!
    run                  Run the Nym client with provided configuration client optionally
                         overriding set parameters
    upgrade              Try to upgrade the client

You can check the necessary parameters for the available commands by running:

./nym-client <command> --help

Initialising a new client instance

Before you can use the client, you need to initalise a new instance of it, which can be done with the following command:

./nym-socks5-client init --id <id> --provider <provider>

The --id in the example above is a local identifier so that you can name your clients; it is never transmitted over the network.

The --provider field needs to be filled with the Nym address of a Network Requester that can make network requests on your behalf. If you don’t want to run your own you can select one from the mixnet explorer by copying its Client ID and using this as the value of the --provider flag. Alternatively, you could use this list.

Since the nodes on this list are the infrastructure for Nymconnect they will support all apps on the default whitelist: Keybase, Telegram, Electrum, Blockstream Green, and Helios.

Choosing a Gateway

By default - as in the example above - your client will choose a random gateway to connect to.

However, there are several options for choosing a gateway, if you do not want one that is randomly assigned to your client:

  • If you wish to connect to a specific gateway, you can specify this with the --gateway flag when running init.
  • You can also choose a gateway based on its location relative to your client. This can be done by appending the --latency-based-selection flag to your init command. This command means that to select a gateway, your client will:
    • fetch a list of all availiable gateways
    • send few ping messages to all of them, and measure response times.
    • create a weighted distribution to randomly choose one, favouring ones with lower latency.

Note this doesn’t mean that your client will pick the closest gateway to you, but it will be far more likely to connect to gateway with a 20ms ping rather than 200ms

Running the socks5 client

You can run the initalised client by doing this:

./nym-socks5-client run --id <id>

Console output

2022-04-27T16:15:45.843Z INFO  nym_socks5_client::client > Starting nym client
2022-04-27T16:15:45.889Z INFO  nym_socks5_client::client > Obtaining initial network topology
2022-04-27T16:15:51.470Z INFO  nym_socks5_client::client > Starting topology refresher...
2022-04-27T16:15:51.470Z INFO  nym_socks5_client::client > Starting received messages buffer controller...
2022-04-27T16:15:51.648Z INFO  gateway_client::client    > Claiming more bandwidth for your tokens. This will use 1 token(s) from your wallet. Stop the process now if you don't want that to happen.
2022-04-27T16:15:51.648Z WARN  gateway_client::client    > Not enough bandwidth. Trying to get more bandwidth, this might take a while
2022-04-27T16:15:51.648Z INFO  gateway_client::client    > The client is running in disabled credentials mode - attempting to claim bandwidth without a credential
2022-04-27T16:15:51.706Z INFO  nym_socks5_client::client > Starting mix traffic controller...
2022-04-27T16:15:51.706Z INFO  nym_socks5_client::client > Starting real traffic stream...
2022-04-27T16:15:51.706Z INFO  nym_socks5_client::client > Starting loop cover traffic stream...
2022-04-27T16:15:51.707Z INFO  nym_socks5_client::client > Starting socks5 listener...
2022-04-27T16:15:51.707Z INFO  nym_socks5_client::socks::server > Listening on 127.0.0.1:1080
2022-04-27T16:15:51.707Z INFO  nym_socks5_client::client> Client startup finished!
2022-04-27T16:15:51.707Z INFO  nym_socks5_client::client> The address of this client is: BFKhbyNsSVwbsGSLwHDkfwH5mwZqZYpnpNjjV7Xo25Xc.EFWd1geWspzyVeinwXrY5fCBMRtAKV1QmK1CNFhAA8VG@BNjYZPxzcJwczXHHgBxCAyVJKxN6LPteDRrKapxWmexv
2022-04-27T16:15:51.707Z INFO  nym_socks5_client::socks::server > Serving Connections...

Using your Socks5 Client

After completing the steps above, your local Socks5 Client will be listening on localhost:1080 ready to proxy traffic to the Network Requester set as the --provider when initialising.

When trying to connect your app, generally the proxy settings are found in settings->advanced or settings->connection.

Here is an example of setting the proxy connecting in Blockstream Green:

Blockstream Green settings

Most wallets and other applications will work basically the same way: find the network proxy settings, enter the proxy url (host: localhost, port: 1080).

In some other applications, this might be written as localhost:1080 if there’s only one proxy entry field.

Last change: 2023-03-21, commit: c0ca04f

Webassembly Client

The Nym webassembly client allows any webassembly-capable runtime to build and send Sphinx packets to the Nym network, for uses in edge computing and browser-based applications.

This is currently packaged and distributed for ease of use via the Nym Typescript SDK library.

The webassembly client allows for the easy creation of Sphinx packets from within mobile apps and browser-based client-side apps (including Electron or similar).

Building apps with nym-client-wasm

Check out the examples section of the SDK docs for examples of simple application framework setups. There are also two example applications located in the clients/webassembly directory in the main Nym platform codebase. The js-example is a simple, bare-bones JavaScript app.

Think about what you’re sending!

Caution

Think about what information your app sends. That goes for whatever you put into your Sphinx packet messages as well as what your app’s environment may leak.

Whenever you write client PEAPPs using HTML/JavaScript, we recommend that you do not load external resources from CDNs. Webapp developers do this all the time, to save load time for common resources, or just for convenience. But when you’re writing privacy apps it’s better not to make these kinds of requests. Pack everything locally.

If you use only local resources within your Electron app or your browser extensions, explicitly encoding request data in a Sphinx packet does protect you from the normal leakage that gets sent in a browser HTTP request. There’s a lot of stuff that leaks when you make an HTTP request from a browser window. Luckily, all that metadata and request leakage doesn’t happen in Nym, because you’re choosing very explicitly what to encode into Sphinx packets, instead of sending a whole browser environment by default.

Last change: 2023-03-21, commit: c0ca04f

Addressing System

When a Nym client is initalised, it generates and stores its own public/private keypair locally. When the client starts, it automatically connects to the Nym network and finds out what Nym infrastructure exists. It then chooses and connects to a specific Gateway node via websocket.

All apps in the Nym network therefore have an address, in the format:

user-identity-key.user-encryption-key@gateway-identity-key

Which in practice, looks something like this:

DguTcdkWWtDyUFLvQxRdcA8qZhardhE1ZXy1YCC7Zfmq.Dxreouj5RhQqMb3ZaAxgXFdGkmfbDKwk457FdeHGKmQQ@4kjgWmFU1tcGAZYRZR57yFuVAexjLbJ5M7jvo3X5Hkcf

This is obviously not very user-friendly and the moment, and will be developed on in the coming months.

Last change: 2023-03-21, commit: c0ca04f

Typescript SDK

The Nym Typescript SDK allows developers to start building browser-based Mixnet applications quickly, by simply importing the SDK into their code via NPM as they would any other Typescript library.

You can find the source code here and the library on NPM here.

Currently developers can use the SDK to do the following entirely in the browser:

  • Create a client
  • Listen for incoming messages and reply to them
  • Encrypt text and binary-encoded messages as Sphinx packets and send these through the mixnet

We will be fleshing out further mixnet-related features in the coming weeks with functionality such as importing/exporting keypairs for developing apps with a retained identity over time.

In the future the SDK will be made up of several components, each of which will allow developers to interact with different parts of Nym’s infrastructure.

ComponentFunctionalityReleased
MixnetCreate clients & keypairs, subscribe to Mixnet events, send & receive messages✔️
CoconutCreate & verify Coconut credentials
ValidatorSign & broadcast Nyx blockchain transactions, query the blockchain

Using the SDK

The following code snippet shows the basic flow of initialising a client, subscribing to an event on the websocket connection, and sending yourself a message through the Mixnet:

import { createNymMixnetClient } from '@nymproject/sdk';

const main = async () => {
  const nym = await createNymMixnetClient();

  const nymApiUrl = 'https://validator.nymtech.net/api';

  // show message payload content when received 
  nym.events.subscribeToTextMessageReceivedEvent((e) => {
    console.log('Got a message: ', e.args.payload);
  });

  // start the client and connect to a gateway
  await nym.client.start({
    clientId: 'My awesome client',
    nymApiUrl,
  });

  // send a message to yourself
  const payload = 'Hello mixnet';
  const recipient = nym.client.selfAddress();
  nym.client.send({ payload, recipient });
  
};

You can send a message to another user (you will need to know their address at a Gateway) with:

const payload = 'Hello mixnet';
const recipient = '<< RECIPIENT ADDRESS GOES HERE >>';
await nym.client.sendMessage({ payload, recipient });

There are also examples for several different frameworks which can be run in the browser:

How it works

The SDK can be thought of as a ‘wrapper’ around the compiled WebAssembly client code: it runs the client (a Wasm blob) in a web worker. This allows us to keep the work done by the client - such as the heavy lifting of creating and multiply-encrypting Sphinx packets - in a seperate thread from our UI, enabling you to build reactive frontends without worrying about the work done under the hood by the client eating your processing power.

The SDK exposes an interface that allows developers to interact with the Wasm blob inside the webworker from frontend code.

Framework Support

Currently, the SDK only works with frameworks that use webpack as a bundler. If you want to use the SDK with a framework that isn’t on this list, such as Angular, or NodeJS, here be dragons! These frameworks will probably use a different bundler than the examples listed above, which are all using Webpack.

Support for environments with different bundlers will be added in subsequent releases.

BundlerSupported
Webpack✔️
Packer

Think about what you’re sending!

Caution

Think about what information your app sends. That goes for whatever you put into your Sphinx packet messages as well as what your app’s environment may leak.

Whenever you write client PEAPPs using HTML/JavaScript, we recommend that you do not load external resources from CDNs. Webapp developers do this all the time, to save load time for common resources, or just for convenience. But when you’re writing privacy apps it’s better not to make these kinds of requests. Pack everything locally.

If you use only local resources within your Electron app or your browser extensions, explicitly encoding request data in a Sphinx packet does protect you from the normal leakage that gets sent in a browser HTTP request. There’s a lot of stuff that leaks when you make an HTTP request from a browser window. Luckily, all that metadata and request leakage doesn’t happen in Nym, because you’re choosing very explicitly what to encode into Sphinx packets, instead of sending a whole browser environment by default.

Last change: 2023-03-21, commit: c0ca04f

Rust SDK (coming soon)

🦀 coming soon 🦀

Last change: 2023-03-21, commit: c0ca04f

Desktop Wallet

The Nym Desktop Wallet lets you interact with your Nym node and to delegate stake to others, see the vesting schedule of tokens, and transfer tokens. In future releases, it will also let you access the Nym mixnet.

You can download it for Mac, Windows, or Linux.

download nym wallet

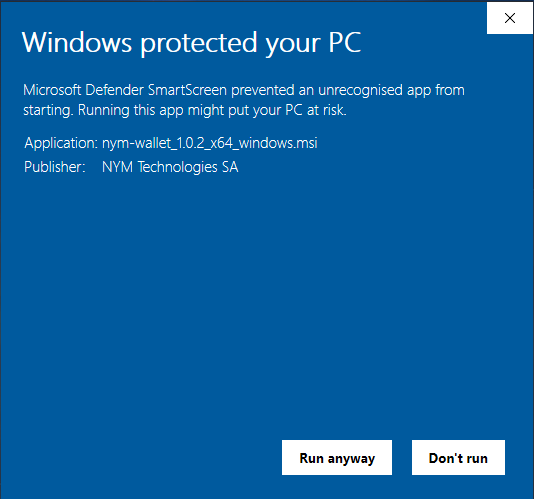
Bypassing security warnings

On Windows you will see a security warning pop up when you attempt to run the wallet. We are in the process of getting app store keys from Microsoft so that this doesn’t happen. See the section below for details on steps to bypass these.

Linux

You will need to chmod +x the AppImage in the terminal (or give it execute permission in your file browser) before it will run.

Windows

You will still encounter warnings when opening the wallet on Windows. This is because - although the wallet is approved by Microsoft - it has less than 10 thousand downloads at the current time. Once the wallet has passed this threshold, this warning will disappear.

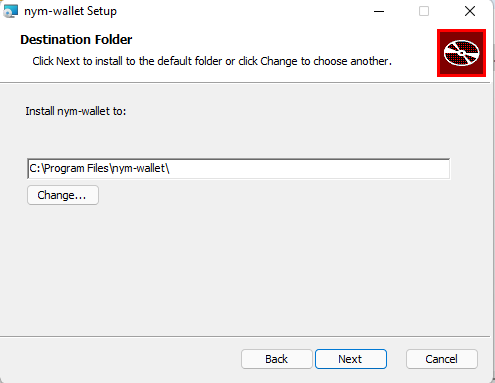
Follow the steps below to bypass the warnings.

  • Select more-info after clicking the msi installer app:

Windows Warning

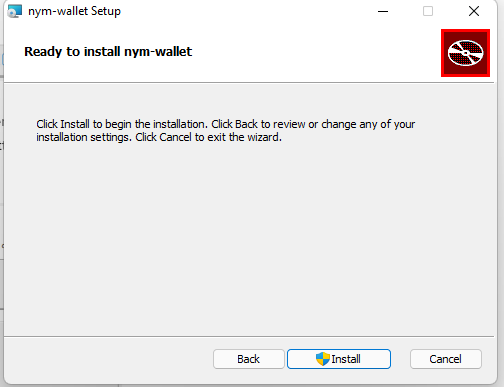
  • Proceed to ‘run-anyway’:

Windows Warning

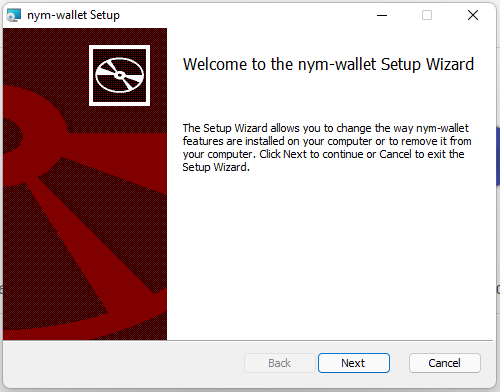
  • Follow the installer instructions:

Windows Warning

Windows Warning

Windows Warning

For developers

If you would like to the compile the wallet yourself, follow the instructions below.

Please note that the wallet has currently only been built on the operating systems for which there are binaries as listed above. If you find an issue or any additional prerequisties, please create an issue or PR against develop on Github.

Software prerequisites for building the wallet

  • git
sudo apt update
sudo apt install git

Verify git is installed with:

git version
# Should return: git version X.Y.Z
  • Yarn

  • NodeJS >= v16.8.0

  • Rust & cargo >= v1.56

We recommend using the Rust shell script installer. Installing cargo from your package manager (e.g. apt) is not recommended as the packaged versions are usually too old.

If you really don’t want to use the shell script installer, the Rust installation docs contain instructions for many platforms.

Additional prerequisites for Ubuntu/Debian systems

sudo apt update
sudo apt install pkg-config build-essential libssl-dev curl jq

Additional prerequisites for Windows

  • When running on Windows you will need to install the c++ build tools.
  • An easy guide to get Rust up and running can be found here.
  • When installing NodeJS please use the current features version.
  • Using a package manager like Chocolatey is recommended.

Removing signing errors when building in development mode

If you’re wanting to build the wallet yourself, you will need to make a few modifications to the file located at nym-wallet/src-tauri/tauri.conf.json before doing so. These relate to the wallet being accepted by Mac and Windows app stores, and so aren’t relevant to you when building and running the wallet yourself.

On all operating systems:

  • set the value of line 49 to false
  • remove lines 50 to 54

As well as these modifications for MacOS and Windows users:

  • MacOS users must also remove line 39
  • Windows users must remove lines 42 to 46

Installation

Once you have made these modifications to tauri.conf.json, inside of the nym-wallet folder, run:

yarn install

Running in Development Mode

Make sure you copy over the contents of the provided .env.sample to a new .env file before proceeding

You can run the wallet without having to install it in development mode by running the following terminal command from the nym-wallet folder

yarn dev

This will then start the Wallet GUI and produce a binary in nym-wallet/target/debug/ named nym-wallet.

Running in Production Mode

Make sure you copy over the contents of the provided .env.sample to a new .env file before proceeding

To build and install the wallet, run the following terminal command from the nym-wallet folder.

yarn build

This will build an executable file that you can use to install the wallet on your machine. The output will compile different types of binaries dependent on your hardware / OS system. Once the binaries are built, they can be located as follows:

Binary output directory structure
**macos**
|
└─── target/release
|   |─ nym-wallet
└───target/release/bundle/dmg
│   │─ bundle_dmg.sh
│   │─ nym-wallet.*.dmg
└───target/release/bundle/macos/MacOs
│   │─ nym-wallet
|
**Linux**
└─── target/release
|   │─  nym-wallet
└───target/release/bundle/appimage
│   │─  nym-wallet_*_.AppImage
│   │─  build_appimage.sh
└───target/release/bundle/deb
│   │─  nym-wallet_*_.deb
|
**Windows**
└─── target/release
|   │─  nym-wallet.exe
└───target/release/bundle/msi
│   │─  nym-wallet_*_.msi

Importing or creating account(s) when you have signed in with mnemonic

To import or create a new account, first you need to create a password for your wallet:

  1. Log out from the wallet
  2. Sign in using “Sign in with mnemonic” button
  3. On the next screen select “Create a password“
  4. Type in the mnemonic you want to create a password for and follow the next steps
  5. Sign back in the wallet using your new password
  6. Come back to this page to import or create new accounts

Importing or creating account(s) when you have signed in with mnemonic but a password already exists on your machine

To import or create a new account, you need to log in with your existing password or create a new password.

Creating a new password will overwrite any old one stored on your machine. Make sure you have saved any mnemonics associated with the password before creating a new one.

  1. Log out
  2. Click on “Forgot password”
  3. On the next screen select “Create new password”
  4. Follow the instructions and create a new password
  5. Sign in using your new password

CLI tool for wallet encrypted file (password) recovery:

The mnemonics that are stored in the local password protected file can also be decrypted and recovered through a simple CLI tool, nym-wallet-recovery-cli.

nym-wallet-recovery –file saved-wallet.json –password foo

The saved wallet file can be found in $XDG_DATA_HOME or $HOME/.local/share on Linux, $HOME/Library/Application Support on Mac, and C:\Users\username\AppData\Local on Windows.

Last change: 2023-03-21, commit: c0ca04f

CLI Wallet

If you have already read our validator setup and maintenance documentation you will have seen that we compile and use the nyxd binary primarily for our validators. This binary can however be used for many other tasks, such as creating and using keypairs for wallets, or automated setups that require the signing and broadcasting of transactions.

Using nyxd binary as a CLI wallet

You can use the nyxd as a minimal CLI wallet if you want to set up an account (or multiple accounts). Just compile the binary as per the documentation, stopping after the building your validator step is complete. You can then run nyxd keys --help to see how you can set up and store different keypairs with which to interact with the Nyx blockchain.

Last change: 2023-03-21, commit: c0ca04f

Mixnet Explorer

The Nym Network Explorer lets you explore the Nym network. We have open-sourced the explorer so that anyone can run an instance of it, further decentralising the network!

Prerequisites

  • git
sudo apt update
sudo apt install git

Verify git is installed with:

git version
# Should return: git version X.Y.Z
  • (Debian/Ubuntu) pkg-config, build-essential, libssl-dev, curl, jq
sudo apt update
sudo apt install pkg-config build-essential libssl-dev curl jq
  • NodeJS (use nvm install to automatically install the correct version) and npm

  • Rust & cargo >= 1.66

We recommend using the Rust shell script installer. Installing cargo from your package manager (e.g. apt) is not recommended as the packaged versions are usually too old.

If you really don’t want to use the shell script installer, the Rust installation docs contain instructions for many platforms.

Local Development

Complete the steps in the building nym section, before cd-ing into nym/explorer.

Start a development server with hot reloading running on http://localhost:3000 with the following commands from inside the explorer directory:

nvm install # install relevant nodejs and npm versions 
npm install
npm run start

eslint and prettier are already configured.

You can lint the code by running:

npm run lint

This command will only show linting errors and will not fix them!

To fix all linting errors automatically run:

npm run lint:fix

Please see the development docs in explorer/docs for more information on the structure and design of this app.

Deployment

Complete the steps in the building nym section, before cd-ing into nym/explorer.

The Network Explorer should be run on a machine with at least 4GB of RAM - the build process might fail if run on a less powerful machine.

Building the Explorer UI

Build the UI with these commands from within the explorer directory:

nvm install # install relevant nodejs and npm versions 
npm install
npm run build

The output will be in the dist directory.

This can then be either served directly from the nym directory, or from its own directory if you wish. See the template nginx config below for more on how to host this.

Building the Explorer API

The Explorer API was built in the previous step with cargo build.

Automating the explorer with systemd

You will most likely want to automate the Explorer-API restarting if your server reboots. Below is a systemd unit file to place at /etc/systemd/system/nym-explorer-api.service:

[Unit]
Description=Nym Explorer API (1.1.0)
StartLimitIntervalSec=350
StartLimitBurst=10

[Service]
User=nym
Type=simple
Environment="API_STATE_FILE=/home/nym/network-explorer/explorer-api-state.json"
Environment="GEO_IP_SERVICE_API_KEY=c69155d0-25f6-11ec-80bc-75e5dbd322c3"
ExecStart=explorer/api/location
Restart=on-failure
RestartSec=30

[Install]
WantedBy=multi-user.target

Proceed to start it with:

systemctl daemon-reload # to pickup the new unit file
systemctl enable nymd   # to enable the service
systemctl start nymd    # to actually start the service
journalctl -f           # to monitor system logs showing the service start

Installing and configuring nginx for HTTPS

Setup

Nginx is an open source software used for operating high-performance web servers. It allows us to set up reverse proxying on our validator server to improve performance and security.

Install nginx and allow the ‘Nginx Full’ rule in your firewall:

sudo ufw allow 'Nginx Full'

Check nginx is running via systemctl:

systemctl status nginx

Which should return:

● nginx.service - A high performance web server and a reverse proxy server
   Loaded: loaded (/lib/systemd/system/nginx.service; enabled; vendor preset: enabled)
   Active: active (running) since Fri 2018-04-20 16:08:19 UTC; 3 days ago
     Docs: man:nginx(8)
 Main PID: 2369 (nginx)
    Tasks: 2 (limit: 1153)
   CGroup: /system.slice/nginx.service
           ├─2369 nginx: master process /usr/sbin/nginx -g daemon on; master_process on;
           └─2380 nginx: worker process

Configuration

Replace the default nginx configuration at /etc/nginx/sites-available/ with:

server {
  listen 80;
  listen [::]:80;
  server_name domain;
  root html_location;
  location / {
    try_files /$uri /$uri/index.html /index.html =404;
  }

  location /api {
      proxy_pass http://127.0.0.1:8000;
		  rewrite /api/(.*) /$1  break;
                  proxy_set_header  X-Real-IP $remote_addr;
                  proxy_set_header  Host $host;
                  proxy_set_header  X-Real-IP $remote_addr;
  }
}

Followed by:

sudo apt install certbot nginx python3
certbot --nginx -d nym-validator.yourdomain.com -m you@yourdomain.com --agree-tos --noninteractive --redirect

Caution

If using a VPS running Ubuntu 20: replace certbot nginx python3 with python3-certbot-nginx

Configure your firewall

The following commands will allow you to set up a firewall using ufw.

# check if you have ufw installed
ufw version
# if it is not installed, install with
sudo apt install ufw -y
# enable ufw
sudo ufw enable
# check the status of the firewall
sudo ufw status

Now open the ports:

sudo ufw allow 22,80,443/tcp
# check the status of the firewall
sudo ufw status
Last change: 2023-03-21, commit: c0ca04f

Smart Contracts

The Nyx blockchain is based on CosmWasm. It allows users to code smart contracts in a safe subset of the Rust programming language, easily export them to WebAssembly, and upload them to the blockchain. Information about the chain can be found on the Nyx blockchain explorer.

There are currently two smart contracts on the Nyx chain:

  • the Mixnet contract which manages the network topology of the mixnet, tracking delegations and rewarding.
  • the Vesting contract which manages NYM token vesting functionality.

Users will soon be able to create and upload their own CosmWasm smart contracts to Nyx and take advantage of applications such as the Coconut Credential Scheme - more to be announced regarding this very soon.

Last change: 2023-03-21, commit: c0ca04f

Mixnet Contract

The Mixnet smart contract is a core piece of the Nym system, functioning as the mixnet directory and keeping track of delegations and rewards: the core functionality required by an incentivised mixnet. You can find the code and build instructions here.

Functionality

The Mixnet contract has multiple functions:

  • storing bonded mix node and gateway information (and removing this on unbonding).
  • providing the network-topology to the (cached) validator API endpoint used by clients on startup for routing information.
  • storing delegation and bond amounts.
  • storing reward amounts.

The addresses of deployed smart contracts can be found in the network-defaults directory of the codebase alongside other network default values.

Last change: 2023-03-21, commit: c0ca04f

Vesting Contract

The vesting contract allows for the creation of vesting accounts, allowing NYM tokens to vest over time, and for users to minimally interact with the Mixnet using their unvested tokens. You can find the code and build instructions here.

Functionality

The Vesting contract has multiple functions:

  • Creating and storing vesting NYM token vesting accounts.
  • Interacting with the Mixnet using vesting (i.e. non-transferable) tokens, allowing users to delegate their unvested tokens.

The addresses of deployed smart contracts can be found in the network-defaults directory of the codebase alongside other network default values.

Last change: 2023-03-21, commit: c0ca04f

RPC Nodes

RPC Nodes (which might otherwise be referred to as ‘Lite Nodes’ or just ‘Full Nodes’) differ from Validators in that they hold a copy of the Nyx blockchain, but do not participate in consensus / block-production.

You may want to set up an RPC Node for querying the blockchain, or in order to have an endpoint that your app can use to send transactions.

In order to set up an RPC Node, simply follow the instructions to set up a Validator, but exclude the nyxd tx staking create-validator command.

Last change: 2023-03-21, commit: c0ca04f

Ledger Live Support

Use the following instructions to interact with the Nyx blockchain - either with deployed smart contracts, or just to send tokens - using your Ledger device to sign transactions.

Prerequisites

  • Download and install Ledger Live.
  • Compile the nyxd binary as per the instructions here. Stop after you can successfully run nyxd and get the helptext in your console output.

Prepare your Ledger App

  • Plug in your Ledger device
  • Install the Cosmos (ATOM) app by following the instructions here. This app allows you to interact with any Cosmos SDK chain - you can manage your ATOM, OSMOSIS, NYM tokens, etc.
  • On the device, navigate to the Cosmos app and open it

Create a keypair

Add a reference to the ledger device on your local machine by running the following command in the same directory as your nyxd binary:

nyxd keys add ledger_account --ledger 

Command help with nyxd

More information about each command is available by consulting the help section (--help) at each layer of nyxd’s commands:

# logging top level command help
nyxd --help

# logging top level command help for transaction commands 
nyxd tx --help

# logging top level command help for transaction commands utilising the 'bank' module
nyxd tx bank --help

Sending tokens between addresses

Perform a transaction from the CLI with nyxd, appending the --ledger option to the command.

As an example, the below command will send 1 NYM from the ledger account to the $DESTINATION_ACCOUNT:

nyxd tx bank send ledger_account $DESTINATION_ACCOOUNT 1000000unym --ledger --node https://rpc.dev.nymte.ch:443

When a command is run, the transaction will appear on the Ledger device and will require physical confirmation from the device before being signed.

Nym-specific transactions

Nym-specific commands and queries, like bonding a mix node or delegating unvested tokens, are available in the wasm module, and follow the following pattern:

# Executing commands
nyxd tx wasm execute $CONTRACT_ADDRESS $JSON_MSG

# Querying the state of a smart contract 
nyxd query wasm contract-state smart $CONTRACT_ADDRESS $JSON_MSG

You can find the value of $CONTRACT_ADDRESS in the network defaults file.

The value of $JSON_MSG will be a blog of json formatted as defined for each command and query. You can find these definitions for the mixnet smart contract here and for the vesting contract here under ExecuteMsg and QueryMsg.

Example command execution:

Delegate to a mix node

You can delegate to a mix node from the CLI using nyxd and signing the transaction with your ledger by filling in the values of this example:

CONTRACT_ADDRESS=mixnet_contract_address

./nyxd tx wasm execute $CONTRACT_ADDRESS '{"delegate_to_mixnode":{"mix_identity":"MIX_NODE_IDENTITY","amount":{"amount":"100000000000","denom":"unym"}}}' --ledger --from admin --node https://rpc.dev.nymte.ch:443 --gas-prices 0.025unymt --gas auto -b block

By replacing the value of CONTRACT_ADDRESS with the address of the vesting contract, you could use the above command to use tokens held in the vesting contract.

Query a vesting schedule

You can query for (e.g.) seeing the current vesting period of an address by filling in the values of the following:

CONTRACT_ADDRESS=vesting_contract_address

nyxd query wasm contract-state smart $CONTRACT_ADDRESS '{"get_current_vesting_period"}:{"address": "address_to_query_for"}' --ledger --from admin --node https://rpc.dev.nymte.ch:443 --chain-id qa-net --gas-prices 0.025unymt --gas auto -b block  
Last change: 2023-03-21, commit: c0ca04f

Coconut

Coconut is in active development - stay tuned for code and integration examples

Coconut is a cryptographic signature scheme that produces privacy-enhanced credentials. It lets application programmers who are concerned with resource access control to think and code in a new way.

Most of the time, when we build system security, we think of who questions:

  • Has Alice identified herself (authentication)?
  • Is Alice allowed to take a specific action (authorisation)?

Coconut fundamentally changes these questions. Rather than asking who a user is, it allows application designers to ask different questions, mostly centered around questions of rights:

  • Does the entity taking this action have a right to do X?

This allows a different kind of security. Many of the computer systems we talk to every day don’t need to know who we are, they only need to know if we have a right to use the system. Coconut allows signing authorities and validators to work together to determine whether a given private key holder has a right to take an action. The credentials are generated cooperatively by decentralised, trustless systems.

Once the credentials are generated, they can be re-randomized: entirely new credentials, which no one has ever seen before, can be presented to service providers, and magically validated without being linkable back to the credential originally given out by validators.

These properties allow Coconut credentials to act as something like a decentralized and fully private version of OAuth credentials, or like cryptographic bearer tokens generated by decentralised systems. The tokens can be mutated so that they are not traceable, but still verified with the original permissions intact.

Users present cryptographic claims encoded inside the credentials to get secure access to resources despite the systems verifying credential usage not being able to know who they are.

Re-randomisation vs pseudonymity

We stand on the shoulders of giants. Ten years ago, Bitcoin showed the way forward by allowing people to control resource access without recourse to who questions. Rather, in Bitcoin and succeeding blockchains, a private key proves a right to use.

But as we can now see, private keys in blockchain systems act only as a minor barrier to finding out who is accessing resources. A Bitcoin or Ethereum private key is effectively a long-lived pseudonym which is easily traceable through successive transactions.

Coconut allows us to build truly private systems rather than pseudonymous ones.

How does Coconut work?

Just like normal credentials, Nym’s Coconut credentials can be signed with a secret key and later verified by anybody with the correct public key. But Nym credentials have additional superpowers when compared to “normal” signature schemes like RSA or DSA.

Specifically, Coconut is a blinded, re-randomizable, selective disclosure threshold credential signature scheme. That’s quite a mouthful, so let’s break it down into its component parts.

Let’s say you have a message with the content This credential controls X in hand. In addition to the normal sign(message, secretKey) and verify(message, publicKey) functions present in other signature schemes, Coconut adds the following:

  1. Blind signatures - disguises message content so that the signer can’t see what they’re signing. This defends users against signers: the entity that signed can’t identify the user who created a given credential, since they’ve never seen the message they’re signing before it’s been blinded (turned into gobbledygook). Coconut uses zero-knowledge proofs so that the signer can sign confidently without seeing the unblinded content of the message.

  2. Re-randomizable signatures - take a signature, and generate a brand new signature that is valid for the same underlying message This credential controls X. The new bitstring in the re-randomized signature is equivalent to the original signature but not linkable to it. So a user can “show” a credential multiple times, and each time it appears to be a new credential, which is unlinkable to any previous “show”. But the underlying content of the re-randomized credential is the same (including for things like double-spend protection). This once again protects the user against the signer, because the signer can’t trace the signed message that they gave back to the user when it is presented. It also protects the user against the relying party that accepts the signed credential. The user can show re-randomized credentials repeatedly, and although the underlying message is the same in all cases, there’s no way of tracking them by watching the user present the same credential multiple times.

  3. Selective disclosure of attributes - allows someone with the public key to verify some, but not all, parts of a message. So you could for instance selectively reveal parts of a signed message to some people, but not to others. This is a very powerful property of Coconut, potentially leading to diverse applications: voting systems, selective revelation of medical data, privacy-friendly KYC systems, etc.

  4. Threshold issuance - allows signature generation to be split up across multiple nodes and decentralized, so that either all signers need to sign (n of n where n is the number of signers) or only a threshold number of signers need to sign a message (t of n where t is the threshold value).

Taken together, these properties provide privacy for applications when it comes to generating and using signatures for cryptographic claims. If you compare it to existing tech, you might think of it as a sort of supercharged decentralized privacy-friendly JWT.

A slightly expanded view of Coconut is available in this blog post.

Using Coconut for blockchain transaction privacy

In the context of a blockchain currency system, Coconut allows us to create a privacy-enhanced Coconut credential which provably represents an amount under control of a given entity. The credential can then be “spent” anonymously, as if it were the original value. Double-spending protections apply to the credential, so it can only be spent once. Nyx Validators can then unlock the value so it can be redeemed by the party holding the credential.

Although there’s still work to be done to integrate it against various blockchains, in principle Coconut can anonymise blockchain transactions in any system which provides multi-sig. We’re working on Cosmos integration at the moment. Bitcoin and Ethereum are also obvious targets here.

Coconut is simple and flexible, and can ensure privacy for more than coin transfers; it can provide privacy for more complex smart contracts as well.

Finally, it should be mentioned that Coconut can be applied to both blockchain and non-blockchain systems - it’s a general purpose technology.

Last change: 2023-03-21, commit: c0ca04f

Bandwidth Credentials

You can now try using Nym Bandwidth Credentials in our Sandbox testnet environment.

Create a sandbox.env file with the following details:

CONFIGURED=true

RUST_LOG=info
RUST_BACKTRACE=1

BECH32_PREFIX=nymt
MIX_DENOM=unymt
MIX_DENOM_DISPLAY=nymt
STAKE_DENOM=unyxt
STAKE_DENOM_DISPLAY=nyxt
DENOMS_EXPONENT=6

REWARDING_VALIDATOR_ADDRESS="nymt1mxuweurc066kprnngtm8zmvam7m2nw26yatpmv"
MIXNET_CONTRACT_ADDRESS="nymt1dlsvvgey26ernlj0sq2afjluh3qd4ap0k9eerekfkw5algqrwqksaf2qf7"
VESTING_CONTRACT_ADDRESS="nymt19g9xuqrvz2frv905v3fc7puryfypluhg383q9zwsmedrlqekfgys62ykm4"
BANDWIDTH_CLAIM_CONTRACT_ADDRESS="nymt1rhmk9udessnv3r8f3eh2s03f45svnjaczpmcqz"
MULTISIG_CONTRACT_ADDRESS="nymt142dkm8xe9f0ytyarp7ww4kvclva65705jphxsk9exn3nqdsm8jkqnp06ac"
COCONUT_BANDWIDTH_CONTRACT_ADDRESS="nymt1ty0frysegskh6ndm3v96z5xdq66qzcu0aw7xcxlgp54jg0mjwlgqplc6v0"
COCONUT_DKG_CONTRACT_ADDRESS="nymt1gwk6muhmzeuxje7df7rjvqwl2vex0kj4t2hwuzmyx5k62kfusu5qk4k5z4"
GROUP_CONTRACT_ADDRESS="nymt14ry36mwauycz08v8ndcujghxz4hmua5epxcn0mamlr3suqe0l2qsqx5ya2"

STATISTICS_SERVICE_DOMAIN_ADDRESS="http://0.0.0.0"
NYXD="https://sandbox-validator1.nymtech.net"
NYM_API="https://sandbox-validator1-api.nymtech.net/api"

Create an account on Sandbox using the nym-cli:

./nym-cli --config-env-file <path-to>sandbox.env account create

You will need nymt funds sent to this account. Get in touch via Nym Telegram or Discord and we can send them to you.

Next, you init the nym-client with the enabled credentials mode set to true:

./nym-client --config-env-file <path-to>sandbox.env init --id <ID> --enabled-credentials-mode true

Using the new credentials binary, purchase some credentials for the client. The recovery directory is a directory where the credentials will be temporarily stored in case the request fails.

./credential --config-env-file <path-to>sandbox.env run --client-home-directory <path-to-the-client-config> --nyxd-url https://sandbox-validator1.nymtech.net --mnemonic “<mnemonic of the account created above>” --amount 50 --recovery-dir <a-path>

You can redeem this now by running the nym-client, in enabled credentials mode:

./nym-client --config-env-file <path-to>sandbox.env run --id <ID> --enabled-credentials-mode true

Run the network requester:

./nym-network-requester run

Now time to init the socks5 client:

./nym-socks5-client --config-env-file <path-to>sandbox.env init --id <ID> --provider <insert provider address which was returned when init-ing the nym-client> --enabled-credentials-mode true

Purchase credentials for this now too:

./credential --config-env-file <path-to>sandbox.env run --client-home-directory <path-to-socks5-config> --nyxd-url https://sandbox-validator1.nymtech.net --mnemonic “<any valid sandbox mnemonic>” --amount 100 --recovery-dir <a-path>

Run the socks5 client:

./nym-socks5-client --config-env-file <path-to>sandbox.env run --id <ID> --enabled-credentials-mode true

NOTE

You can check to see if credentials have been correctly purchased by installing sqlite, and proceeding to do the following:

sqlite3  ~/.nym/socks5-clients/<ID>/data/db.sqlite 
select * from coconut_credentials;

Keep in mind 1GB = 1NYM

Last change: 2023-03-21, commit: c0ca04f

Nym-CLI

This is a CLI tool for interacting with:

  • the Nyx blockchain (account management, querying the chain state, etc)
  • the smart contracts deployed on Nyx (bonding and unbonding mixnodes, collecting rewards, etc)

It provides a convenient wrapper around the nymd client, and has similar functionality to the nyxd binary for querying the chain or executing smart contract methods.

Building

The nym-cli binary can be built by running cargo build --release in the nym/tools/nym-cli directory.

Useage

You can see all available commands with:

./nym-cli --help      

Console output


nym-cli 
A client for interacting with Nym smart contracts and the Nyx blockchain

USAGE:
    nym-cli [OPTIONS] <subcommand>

OPTIONS:
        --config-env-file <CONFIG_ENV_FILE>
            Overrides configuration as a file of environment variables. Note: individual env vars
            take precedence over this file.

    -h, --help
            Print help information

        --mixnet-contract-address <MIXNET_CONTRACT_ADDRESS>
            Overrides the mixnet contract address provided either as an environment variable or in a
            config file

        --mnemonic <MNEMONIC>
            Provide the mnemonic for your account. You can also provide this is an env var called
            MNEMONIC.

        --nymd-url <NYMD_URL>
            Overrides the nymd URL provided either as an environment variable NYMD_VALIDATOR or in a
            config file

        --validator-api-url <VALIDATOR_API_URL>
            Overrides the validator API URL provided either as an environment variable API_VALIDATOR
            or in a config file

        --vesting-contract-address <VESTING_CONTRACT_ADDRESS>
            Overrides the vesting contract address provided either as an environment variable or in
            a config file

subcommandS:
    account             Query and manage Nyx blockchain accounts
    block               Query chain blocks
    cosmwasm            Manage and execute WASM smart contracts
    generate-fig        Generates shell completion
    help                Print this message or the help of the given subcommand(s)
    mixnet              Manage your mixnet infrastructure, delegate stake or query the directory
    signature           Sign and verify messages
    tx                  Query for transactions
    vesting-schedule    Create and query for a vesting schedule

Features

You can use this binary for account management, querying and sending transactions to the mixnet smart contracts.

Currently supported features include:

  • Account Management
    • create a new account with a random mnemonic
    • query the account balance
    • query the account public key (needed to verify signatures)
    • query for transactions originating from the account
    • send tokens to another account
  • Blockchain Queries
    • query for the current block height
    • query for a block at a height
    • query for a block at a timestamp
  • Smart Contract Interaction
    • upload a smart contract
    • instantiate a smart contract
    • upgrade a smart contract
    • execute a smart contract method
  • Mixnet Interaction
    • ledger Directory
    • query for mixnodes
    • query for gateways
  • Operators
    • bond/unbond a mixnode or gateway
    • query for waiting rewards
    • withdraw rewards
    • manage mixnode settings
  • Delegators
    • delegate/undelegate to a mixnode
    • query for waiting rewards
    • withdraw rewards
  • Signature Generation and Verification
    • create a signature for string data (UTF-8)
    • verify a signature for an account
  • Vesting
    • create a vesting schedule
    • query for a vesting schedule
  • Coconut (coming soon)
    • issue credentials
    • verify credentials

Example Usage

Below we have listed some example commands for some of the features listed above.

If ever in doubt what you need to type, or if you want to see alternative parameters for a command, use the nym-cli <subcommand_name> --help to view all available options.

Example:

./nym-cli account create --help     

Console output


Create a new mnemonic - note, this account does not appear on the chain until the account id is used in a transaction

USAGE:
    nym-cli account create [OPTIONS]

OPTIONS:
    --config-env-file <CONFIG_ENV_FILE>
        Overrides configuration as a file of environment variables. Note: individual env vars take precedence over this file.

-h, --help
        Print help information

    --mixnet-contract-address <MIXNET_CONTRACT_ADDRESS>
        Overrides the mixnet contract address provided either as an environment variable or in a
        config file

    --mnemonic <MNEMONIC>
        Provide the mnemonic for your account. You can also provide this is an env var called
        MNEMONIC.

    --nymd-url <NYMD_URL>
        Overrides the nymd URL provided either as an environment variable NYMD_VALIDATOR or in a
        config file

    --validator-api-url <VALIDATOR_API_URL>
        Overrides the validator API URL provided either as an environment variable API_VALIDATOR
        or in a config file

    --vesting-contract-address <VESTING_CONTRACT_ADDRESS>
        Overrides the vesting contract address provided either as an environment variable or in
        a config file

    --word-count <WORD_COUNT>

Create account

Creates an account with a random Mnemonic and a new address.

./nym-cli account create     

Result:

# Mnemonic
assist jungle spoil domain saddle energy box carpet toy resist castle faith talent note outdoor inform cage lecture syrup trigger dress oppose slender museum
# Address
n132tpw4kkfas7ah0vmq78dwurhxljf2f869tlf5

NEVER share your mnemonic with anyone. Keep it stored in a safe and secure location.

Check the current balance of an account

Queries the existing balance of an account.

# Using adddress below for example purposes.
./nym-cli account balance n1hzn28p2c6pzr98r85jp3h53fy8mju5w7ndd5vh     

Result:

2022-11-10T10:28:54.009Z INFO  nym_cli_commands::validator::account::balance > Getting balance for n1hzn28p2c6pzr98r85jp3h53fy8mju5w7ndd5vh...

# Balance for each token will be listed here
0.264 nym
1921.995 nyx

You can also query an accounts balance by using its mnemonic:

./nym-cli account balance --mnemonic <mnemonic>  

Send tokens to an account

Sends tokens to an account using an address.

./nym-cli account send <ADDRESS> <AMOUNT>

Get the current height of a block

Queries the current height balance of an block.

./nym-cli block current-height --mnemonic <mnemonic>

Result:

Current block height:
<BLOCK_HEIGHT>

Query for a mixnode

Query a mixnode on the mixnet.

./nym-cli mixnet query mixnodes --mnemonic <mnemonic>

Bond a mix node

Bond a mix node.

nym-cli mixnet operators mixnode bond --mnemonic <mnemonic> --host <HOST> --signature <SIGNATURE> --sphinx-key <SPHINX_KEY> --identity-key <IDENTITY_KEY> --version <VERSION> --amount <AMOUNT>

The same command can be applied with a gateway. Just replace mixnode with gateway.

Unbond a gateway

Unbond from a gateway.

./nym-cli mixnet operators gateway unbound --mnemonic <mnemonic>

The same command can be applied with a mixnode. Just replace gateway with mixnode.

Claim a vesting reward for a mixnode

Claim rewards for a mixnode bonded with locked tokens.

./nym-cli mixnet operators mixnode rewards vesting-claim --mnemonic <mnemonic>

Claim rewards

./nym-cli mixnet operators mixnode rewards --mnemonic <mnemonic>

Manage Mix node Settings

Manage your mix node settings stored in the directory.

./nym-cli mixnet operators mixnode settings update-config --version <VERSION_NUMBER>

Delegate Stake

Delegate to a mix node.

./nym-cli mixnet delegators delegate --amount <AMOUNT> –mix-id <MIX_ID> --mnemonic <mnemonic>

Undelegate Stake

Remove stake from a mix node.

./nym-cli mixnet delegators undelegate --mix-id <MIX-ID> --mnemonic <mnemonic>

Query a reward for a delegator

Claim rewards accumulated during the delegation of unlocked tokens.

./nym-cli mixnet delegators rewards claim --mix-id <MIX-ID> --mnemonic <mnemonic>

Signature Generation : Sign a message

Sign a message.

./nym-cli signature sign --mnemonic <mnemonic> <MESSAGE>

Result:

{"account_id":<ACCOUNT_ID>,"public_key":{"@type":"/cosmos.crypto.secp256k1.PubKey","key":<PUBLIC_KEY>},"signature":"<OUTPUT_SIGNATURE>"}

Signature Generation : Verify a signature

Verify a signature.

./nym-cli signature verify  --mnemonic <mnemonic> <PUBLIC_KEY_OR_ADDRESS> <SIGNATURE_AS_HEX> <MESSAGE> 

Create a Vesting Schedule

Creates a vesting schedule.

./nym-cli vesting-schedule create --mnemonic <mnemonic> --address <ADDRESS> --amount <AMOUNT>

Query a Vesting Schedule

Query for vesting schedule.

./nym-cli vesting-schedule query --mnemonic <mnemonic>

Staking on someone’s behalf (for custodians)

There is a limitation the the staking address can only perform the following actions (and are visible via the Nym Wallet:

  • Bond on the gaƒteway’s or mix node’s behalf.
  • Delegate or Undelegate (to a mix node in order to begin receiving rewards)
  • Claiming the rewards on the account

:::note The staking address has no ability to withdraw any coins from the parent’s account. :::

The staking address must maintain the same level of security as the parent mnemonic; while the parent mnemonic’s delegations and bonding events will be visible to the parent owner, the staking address will be the only account capable of undoing the bonding and delegating from the mix nodes or gateway.

Query for staking on behlaf of someone else

./nym-cli --config-env-file 'path/to/env/file' --mnemonic <staking address mnemonic>  mixnet delegators delegate --mix-id <input> --identity-key <input> --amount <input>
Last change: 2023-03-21, commit: c0ca04f

Code of Conduct

We are committed to providing a friendly, safe and welcoming environment for all, regardless of level of experience, gender identity and expression, sexual orientation, disability, personal appearance, body size, race, ethnicity, age, religion, nationality, or other similar characteristic.

Please avoid using overtly sexual aliases or other nicknames that might detract from a friendly, safe and welcoming environment for all.

Please be kind and courteous. There’s no need to be mean or rude.

Respect that people have differences of opinion and that every design or implementation choice carries a trade-off and numerous costs. There is seldom a right answer.

Please keep unstructured critique to a minimum. If you have solid ideas you want to experiment with, make a fork and see how it works.

We will exclude you from interaction if you insult, demean or harass anyone. That is not welcome behaviour. We interpret the term “harassment” as including the definition in the Citizen Code of Conduct; if you have any lack of clarity about what might be included in that concept, please read their definition. In particular, we don’t tolerate behaviour that excludes people in socially marginalized groups.

Private harassment is also unacceptable. No matter who you are, if you feel you have been or are being harassed or made uncomfortable by a community member, please contact one of the channel ops or any of the Rust moderation team immediately. Whether you’re a regular contributor or a newcomer, we care about making this community a safe place for you and we’ve got your back.

Likewise any spamming, trolling, flaming, baiting or other attention-stealing behaviour is not welcome.

Last change: 2023-03-21, commit: c0ca04f

Licensing

Nym is Free Software released under the Apache License V2.

All of the contributions of the Nym core developers are © Nym Technologies SA. If you are interested in talking to us about other licenses, please get in touch.

Last change: 2023-03-21, commit: c0ca04f